
Publiczny link
Wprowadzenie
Skuteczne konkurowanie na współczesnym rynku wymaga od przedsiębiorstw dużej elastyczności i umiejętności sięgania po zasoby z zewnątrz. W wielu przypadkach, zwłaszcza gdy wewnętrzne zasoby działu bądź przedsiębiorstwa okazują się niewystarczające, konieczne jest angażowanie zewnętrznych specjalistów, szczególnie gdy projekt lub zadanie ma jednorazowy charakter i zatrudnienie stałego specjalisty jest nieopłacalne.
Aby łatwo i bezpiecznie udostępniać elementy i zadania, platforma WEBCON BPS została wyposażona w funkcjonalność publicznego linku. Pozwala ona szybko i bezproblemowo dzielić się elementami bądź zadaniami z osobami niemającymi dostępu do danej aplikacji lub procesu bądź nawet osobami spoza przedsiębiorstwa, a tym samym wspierać jego działalność.
W niniejszym artykule opisano wspomnianą funkcjonalność i omówiono sposoby jej konfigurowania, a także przedstawiono jej główne cechy.
Włączanie funkcjonalności publicznego linku
Wraz z wdrożeniem funkcjonalności publicznego linku w narzędziu Designer Studio do zakładki „Ustawienia” procesu dodano sekcję Udostępnianie. Aby korzystać ze wspomnianej funkcjonalności w ramach danego procesu, należy zaznaczyć znajdujący się w tej sekcji przycisk wyboru Włącz udostępnianie elementu i zadania.
Po jego zaznaczeniu edytowalne stają się pozostałe pola dostępne w sekcji, tj. Poziom uprawnień oraz Domyślny czas wygaśnięcia udostępnienia (w dniach). Opcja „Poziom uprawnień” zawiera listę rozwijaną pozwalającą określić, czy elementy będą udostępniane do edycji (Edycja), czy też odczytu (Odczyt). Z kolei w polu „Domyślny czas wygaśnięcia udostępnienia (w dniach)” można wpisać liczbę dni, po której udostępnienie przestanie być aktywne (wygaśnie). Liczbę dni można również określać lub wyliczać za pomocą reguły biznesowej wstawianej we wspomnianym polu.

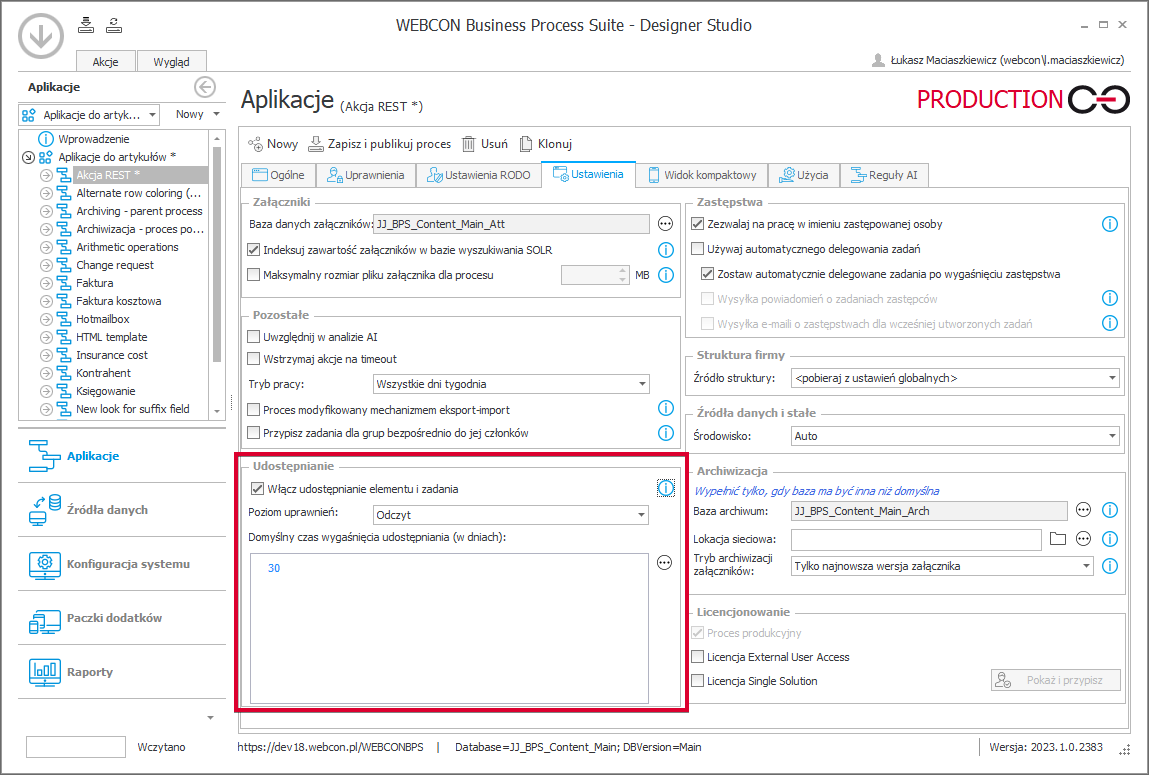
Sekcja „Udostępnianie” umożliwiająca włączenie funkcjonalności publicznego linku
Warto tutaj zwrócić uwagę, że już samo zaznaczenie przycisku włączającego udostępnianie elementów ma pewne konsekwencje w konfiguracji Designer Studio. Jedną z nich jest dostęp do trzech dodatkowych akcji udostępniania, a ponadto możliwość umieszczania przycisku udostępniania bezpośrednio na formularzu. Innym następstwem jest pojawienie się dwóch nowych reguł biznesowych. Wspomniane nowe elementy konfiguracyjne omówiono poniżej.
Zmienne kontekstowe
Po włączeniu wspomnianej funkcjonalności do edytora reguł biznesowych dodawane są nowe zmienne kontekstowe. Zmienna Czy element jest udostępniony? dodana do grupy „Informacje” w węźle „Atrybuty systemowe” pozwala sprawdzać, czy dany element został już udostępniony. Dodatkowo do grupy „Tryby wyświetleń formularza” dodawana jest zmienna Czy jestem w trybie udostępniania, która sprawdza, czy formularz jest aktualnie wyświetlany w trybie udostępniania dla użytkownika tymczasowego.
Akcje udostępniania
Po włączeniu funkcjonalności publicznego linku w ustawieniach procesu użytkownik uzyskuje dostęp do trzech akcji udostępniania należących do grupy „Uprawnienia i udostępnianie”: Udostępnij element workflow, Udostępnij zadanie oraz Zakończ udostępnianie.
Akcje te można osadzać w:
- automatyzacjach procesowych (przycisk „Konfiguracja systemu” → węzeł „Automatyzacje” na drzewie wyboru),
- automatyzacjach dostępnych w ramach obiegu (jako akcje wstawiane globalnie dla obiegu lub w danym kroku)
- we wzorcach akcji (nazwa procesu → przycisk „Konfiguracja” na drzewie wyboru → węzeł „Wzorce akcji”).
Warto zaznaczyć, że akcje te nie są dostępne w automatyzacjach globalnych.
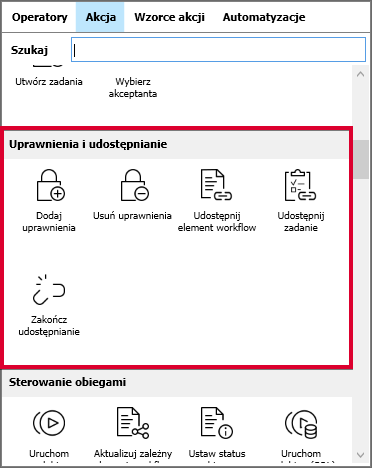

Po włączeniu funkcjonalności publicznego linku dostępne są trzy nowe akcje
Szczegółowy opis każdej akcji przedstawiono poniżej wraz z informacją o kontekstach, w jakich może być ona wywoływana.
- Udostępnij element workflow
Akcja umożliwia udostępnienie wybranego elementu obiegu w systemie BPS do odczytu bądź edycji. Użytkownik określa osobę lub osoby, którym ma zostać udostępniony element, podając co najmniej jeden adres e-mail w polu Element udostępniony dla (adresy e-mail) w konfiguracji akcji (może on również w tym celu użyć reguły biznesowej do zdefiniowania listy adresów e-mail). Dla każdego wskazanego adresu e-mail tworzone jest osobne udostępnienie wraz z osobnym linkiem do wybranego elementu.
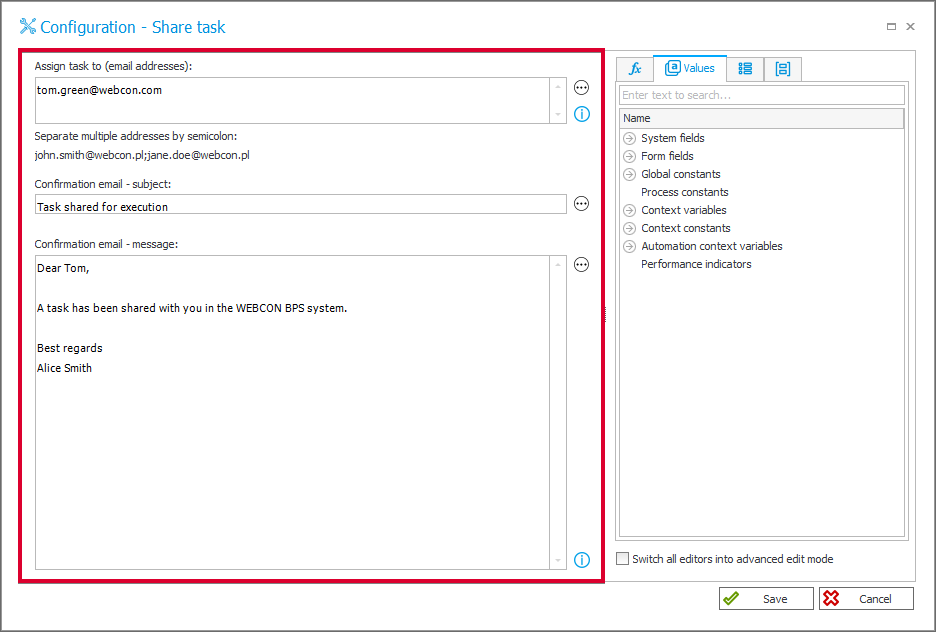
Należy także skonfigurować wiadomość e-mail przesyłaną jako powiadomienie do osoby, której udostępniany jest element. W tym celu w oknie konfiguracji akcji należy wpisać tytuł wiadomości w polu Potwierdzenie e-mail – temat oraz treść wiadomości w polu Potwierdzenie e-mail – wiadomość. Wiadomość taka przesyłana jest na wprowadzony wcześniej adres e-mail wraz z linkiem do udostępnionego elementu i jest wysyłana zgodnie z globalnym szablonem wysyłki powiadomień (przycisk „Konfiguracja systemu” → węzeł „Powiadomienia e-mail” → „Konfiguracja wysyłki e-mail”) (czy to na pewno to miejsce?).
Aby określić poziom uprawnień osoby, której udostępniany jest element, w polu Poziom uprawnień należy wybrać z listy rozwijanej opcję Odczyt (użytkownik może wyłącznie wyświetlać udostępniony element) lub Edycja (użytkownik może edytować treść udostępnionego elementu).
Konfigurując akcję, użytkownik musi także zdefiniować czas, przez jaki udostępnienie pozostanie aktywne, w polu Czas wygaśnięcia udostępnienia (w dniach). Po upływie wskazanego w tym miejscu czasu udostępniania zapisywana jest informacja o udostępnieniu elementu oraz użytkowniku, który go udostępnił, a samo udostępnienie przestaje być aktywne. Warto przy tym pamiętać, że możliwe jest wcześniejsze zakończenie udostępnienia za pomocą akcji Zakończ udostępnianie.
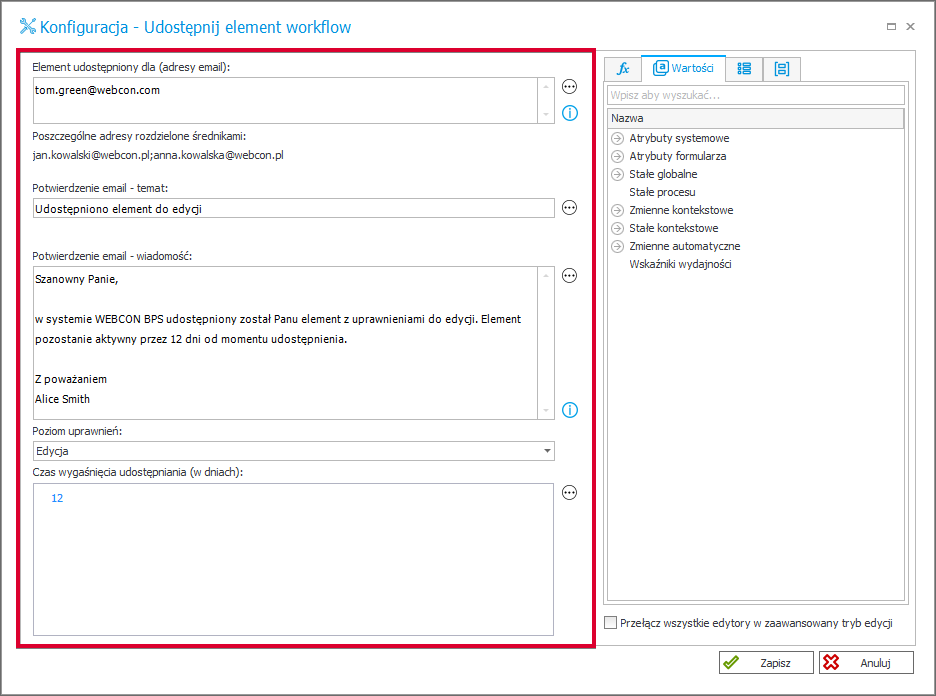

Przykładowa konfiguracja akcji „Udostępnij element workflow”
Jeżeli akcja wywoływana jest po raz kolejny dla już istniejącego i aktywnego udostępnienia przez tego samego użytkownika i dla tego samego adresu e-mail, następuje ponowna edycja udostępnienia i ponownie wysyłany jest link do elementu, o ile akcję umieszczono w automatyzacji osadzonej na ścieżce.
Akcję „Udostępnij element workflow” można wywoływać w następujących kontekstach:
„Na wejście”, „Na zakończenie”, „Na timeout”, „Na otwarcie w przeglądarce”, „Przycisk w menu”, „Na ścieżce przejścia”, „Na zapis elementu workflow”.
- Udostępnij zadanie
Akcja pozwala generować i bezpośrednio udostępniać zadania w systemie. Podobnie jak w przypadku akcji „Udostępnij element workflow” także tutaj zadanie udostępniane jest za pomocą unikalnego linku przesyłanego na określony w polu Przypisz to zadanie do (adresy e-mail) adres e-mail. Możliwe jest podanie wielu adresów e-mail, dla których generowane są osobne linki do zadania.
Co istotne ustawienia zadania są zgodne z ustawieniami określonymi na ścieżce przejścia między krokami, np. jeżeli w polu „Równoległość zadań” (nazwa obiegu → zakładka „Schemat graficzny” → dwukrotne kliknięcie wybranej ścieżki → zakładka „Tworzenie zadania” → pozycja „Równoległość zadań”) wybrano opcję „Wykonanie – Jeden z wielu”, zadanie będzie musiało zostać wykonane tylko przez jedną z osób, którym go udostępniono.
Po wprowadzeniu adresu bądź adresów e-mail należy zredagować wiadomość e-mail, która będzie przesyłana wraz z linkiem w formie powiadomienia. W polu Potwierdzenie e-mail – temat należy wpisać temat wiadomości, natomiast jej treść umieszcza się w polu Potwierdzenie e-mail – wiadomość.
W przypadku akcji „Udostępnij zadanie” nie przewidziano limitu czasu dla udostępnienia – po wykonaniu zadania udostępnienie zadania zastępowane jest automatycznie przez udostępnienie elementu z uprawnieniami tylko do odczytu, które pozostaje aktywne przez rok. To samo dotyczy sytuacji, w której udostępnione wielu osobom zadanie zostanie wykonane przez jedną z nich (o ile zadanie skonfigurowano jako „Wykonanie – Jeden z wielu”).
Warto przy tym zaznaczyć, że po zakończeniu zadania w tabeli danych historycznych zapisywana jest informacja o jego udostępnieniu.
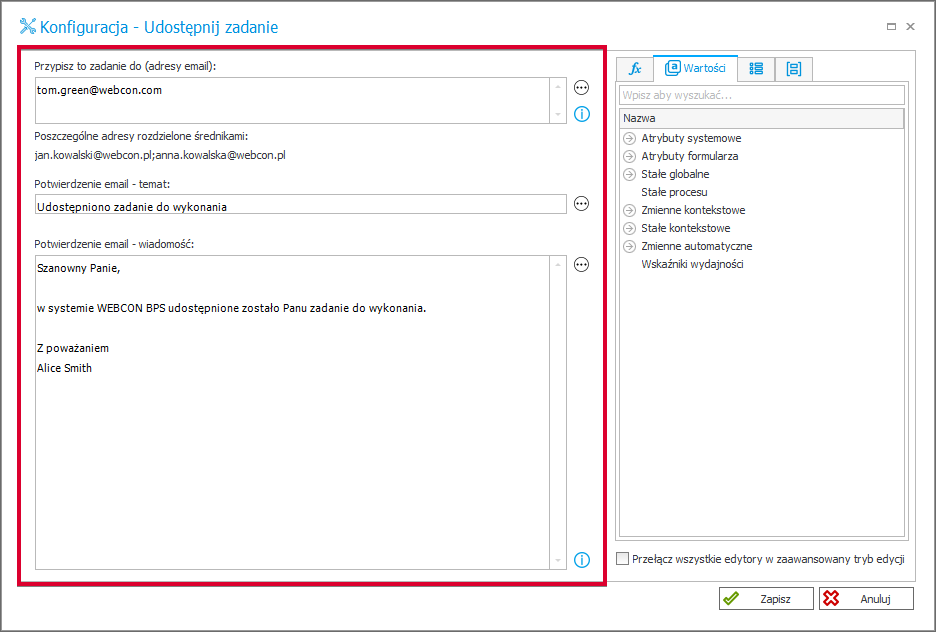

Przykładowa konfiguracja akcji „Udostępnij zadanie”
Ponowne udostępnienie tego samego zadania skutkuje nadpisaniem dotychczasowego udostępnienia i ponownym wysłaniem wiadomości e-mail z powiadomieniem o udostępnieniu
Akcję „Udostępnij zadanie” można wywoływać w następujących kontekstach:
„Na wejście”, „Na zakończenie”, „Na ścieżce przejścia”, „Na zapis elementu workflow”.
- Zakończ udostępnianie
Akcja kończąca wszystkie udostępnienia elementu, dla którego została uruchomiona. W przeciwieństwie do omawianych powyżej akcji w przypadku akcji „Zakończ udostępnianie” nie jest wysyłana wiadomość e-mail. Akcja nie posiada okna konfiguracji – po jej osadzeniu w automatyzacji może zostać dezaktywowana po naciśnięciu przycisku „Dezaktywuj” w menu rozwijanym.
Akcję „Zakończ udostępnianie” można wywoływać w następujących kontekstach:
„Na wejście”, „Na zakończenie”, „Na timeout”, „Na otwarcie w przeglądarce”, „Przycisk w menu”, „Na ścieżce przejścia”, „Na zapis elementu workflow”.
Udostępnianie za pomocą przycisku na formularzu
Oprócz opisanych powyżej akcji pozwalających zautomatyzować proces udostępniania, system WEBCON BPS zapewnia także wygodną, alternatywną metodę w postaci przycisku Udostępnij dostępnego z poziomu formularza. Rozwiązanie to wymaga bezpośredniego działania ze strony użytkownika, który w tym przypadku ręcznie konfiguruje udostępnienie w formularzu.

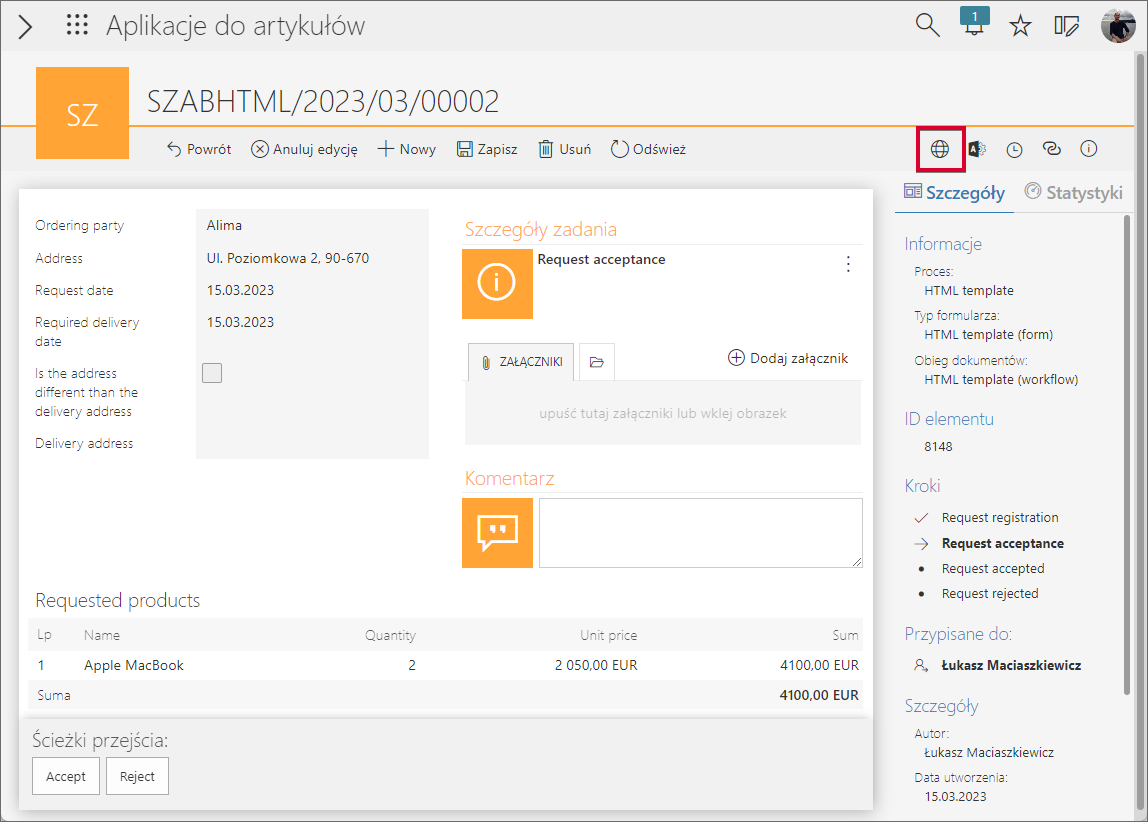
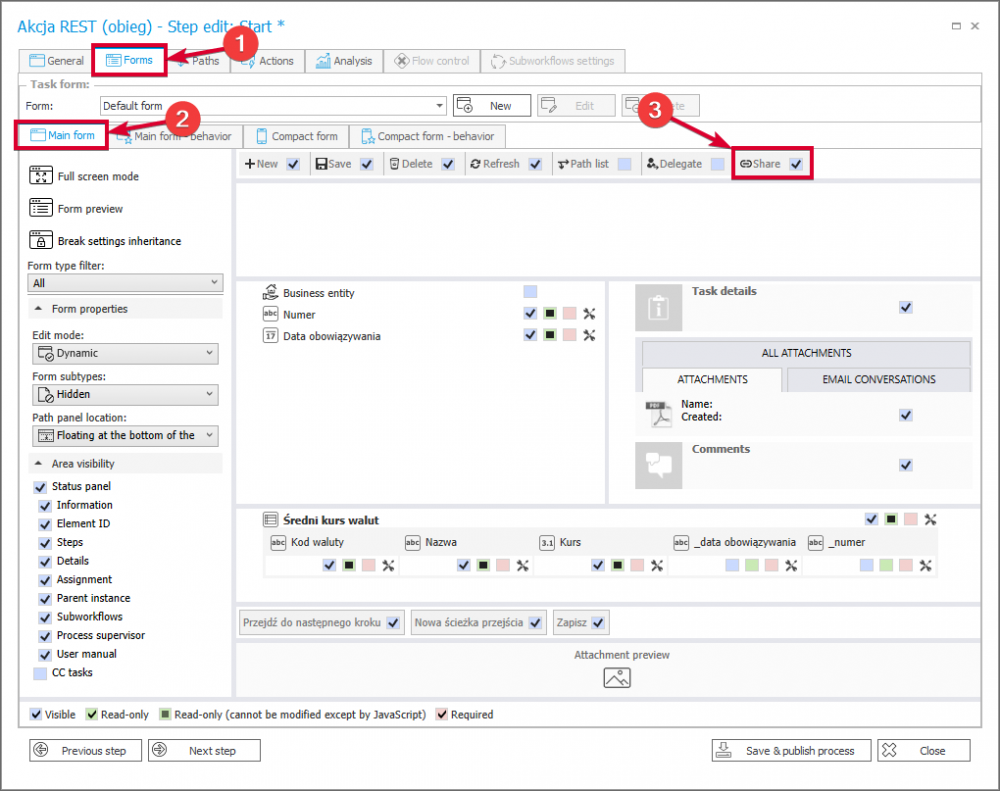
Przykładowy formularz z przyciskiem „Udostępnij” wewnątrz czerwonej ramki
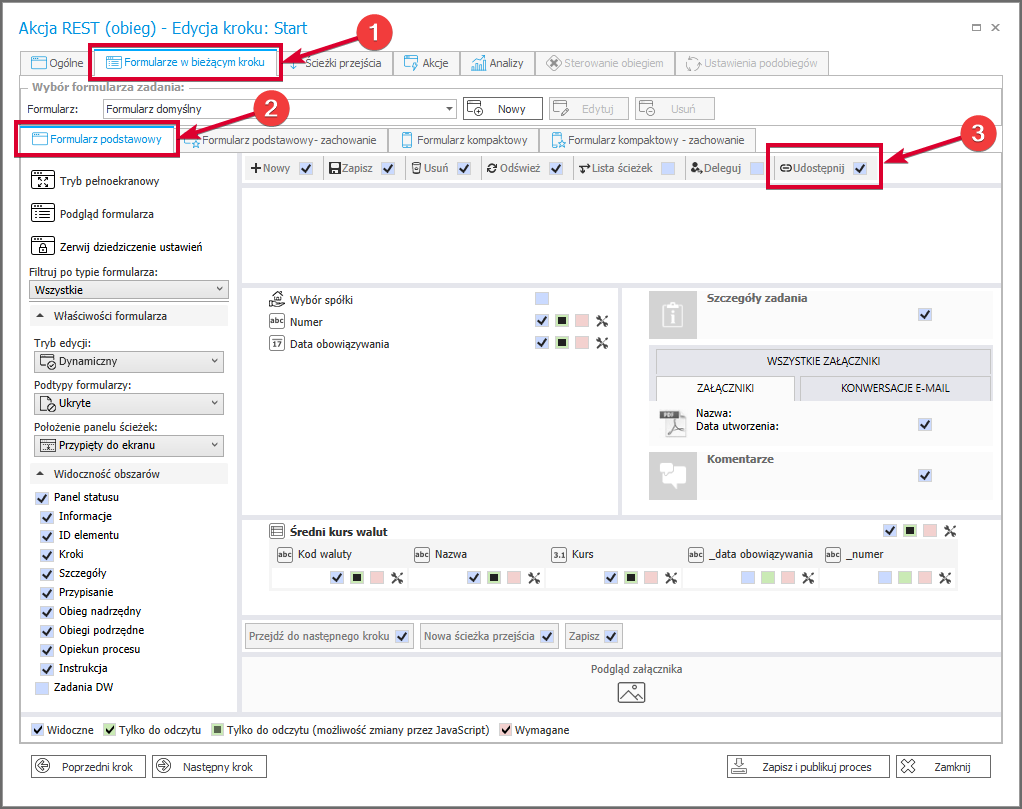
Jak wspomniano we wstępie do artykułu, aby wstawić przycisk „Udostępnij” w formularzu, konieczne jest włączenie funkcjonalności publicznego linku w konfiguracji procesu (zaznaczenie przycisku „Włącz udostępnianie elementu i zadania” w sekcji „Udostępnianie). Sterowanie widocznością przycisku jest możliwe za pomocą matrycy atrybutów (nazwa obiegu → „Formularz podstawowy” → „Matryca atrybutów” → „Standardowe obszary”) oraz poprzez edycję wyglądu formularza w danym kroku (nazwa obiegu → zakładka „Schemat graficzny” → nazwa kroku → zakładka „Formularze w bieżącym kroku”).
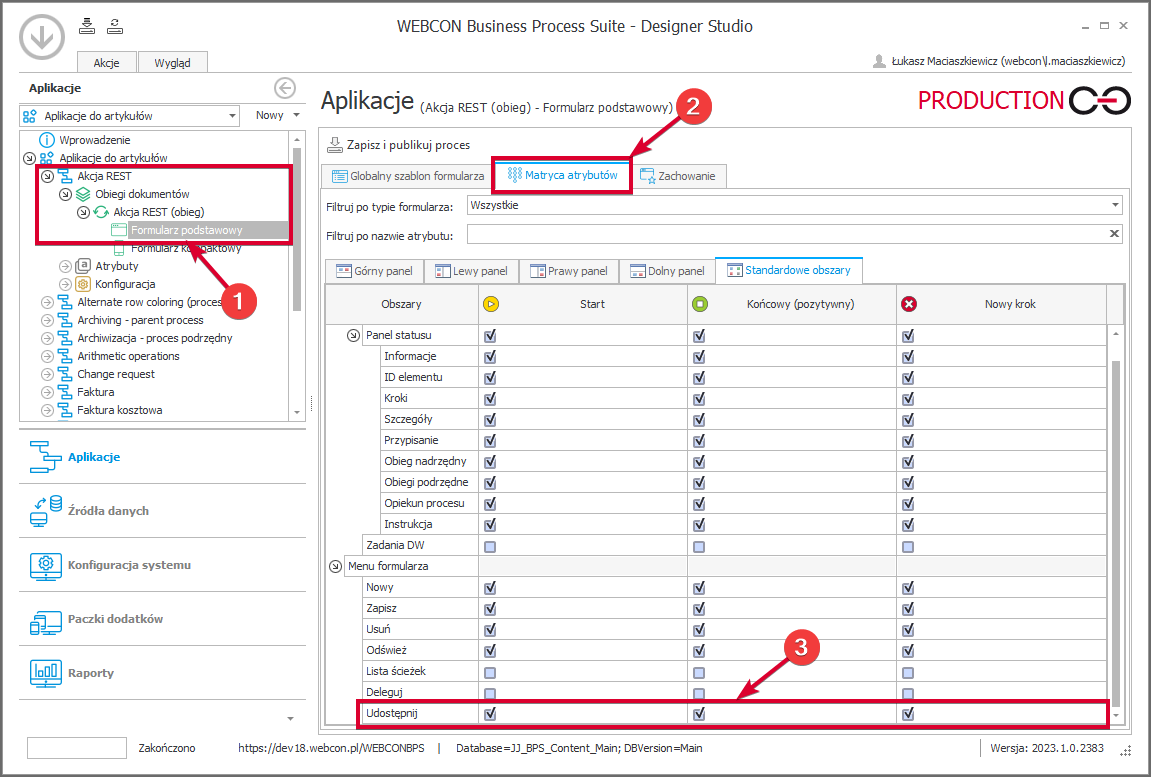

Matryca atrybutów z zaznaczonym polem konfiguracji widoczności przycisku „Udostępnij”
Warto w tym miejscu zauważyć, że przycisk nie jest dostępny dla nowego elementu (nawet jeśli na kroku startowym ustawiono go jako widoczny).

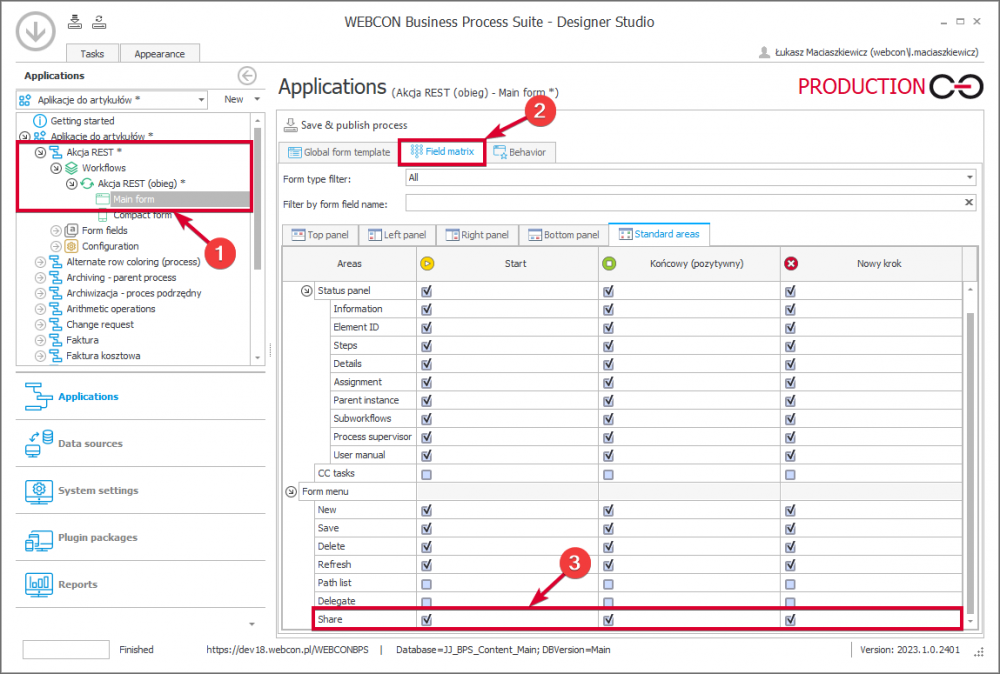
Aby wyłączyć widoczność przycisku „Udostępnij”, należy odznaczyć odpowiedni przycisk wyboru w zakładce „Formularz podstawowy”
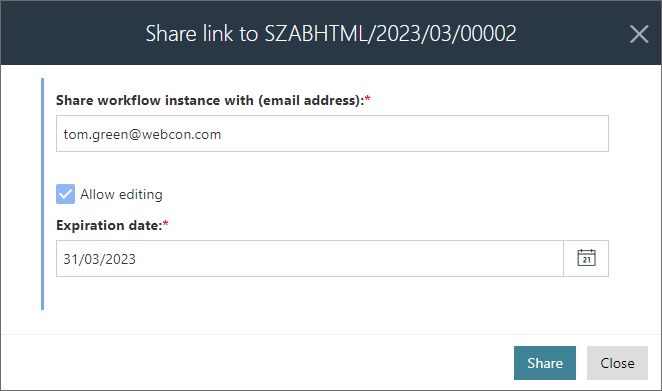
Przycisk nie posiada dodatkowej konfiguracji, a jego działanie jest zgodne z ustawieniami procesu. Po jego naciśnięciu otwiera się okno umożliwiające wprowadzenie adresu e-mail osoby, której udostępniony ma zostać dany element [Udostępnij element obiegu użytkownikowi (adres e-mail)]. Dodatkowo poniżej istnieje możliwość określenia poziomu uprawnień takiej osoby – zaznaczenie przycisku wyboru Zezwól na edytowanie umożliwia edycję udostępnionego elementu, jego odznaczenie skutkuje wyświetlaniem elementu w trybie tylko do odczytu.
W polu Data wygaśnięcia należy określić termin, do którego udostępnienie pozostanie aktywne – po jego upływie nastąpi dezaktywacja udostępnienia.
Po wprowadzeniu wszystkich wymaganych informacji należy kliknąć przycisk Udostępnij.
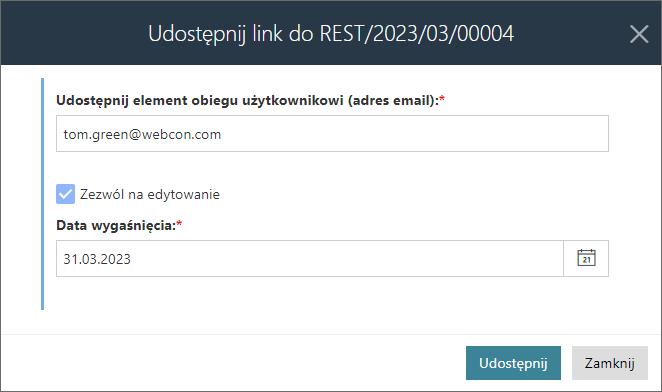

Okno udostępniania otwierane po kliknięciu przycisku „Udostępnij”
Po udostępnieniu elementu (kliknięciu przycisku „Udostępnij”) otwiera się nowe okno z informacją na temat adresu e-mail, dla którego udostępniono element, oraz link do elementu. Ponadto poniżej dostępne są dwa pola umożliwiające zredagowanie wiadomości e-mail przesyłanej na wspomniany adres. Podobnie jak w przypadku konfiguracji akcji, tak i tutaj w polu Temat wstawiany jest temat wiadomości, natomiast jej treść wpisywana jest w polu Wiadomość. Oba te pola są domyślnie wypełnione standardową treścią w aktualnym języku formularza. Wspomniany wcześniej link do elementu jest automatycznie dodawany do treści wiadomości.

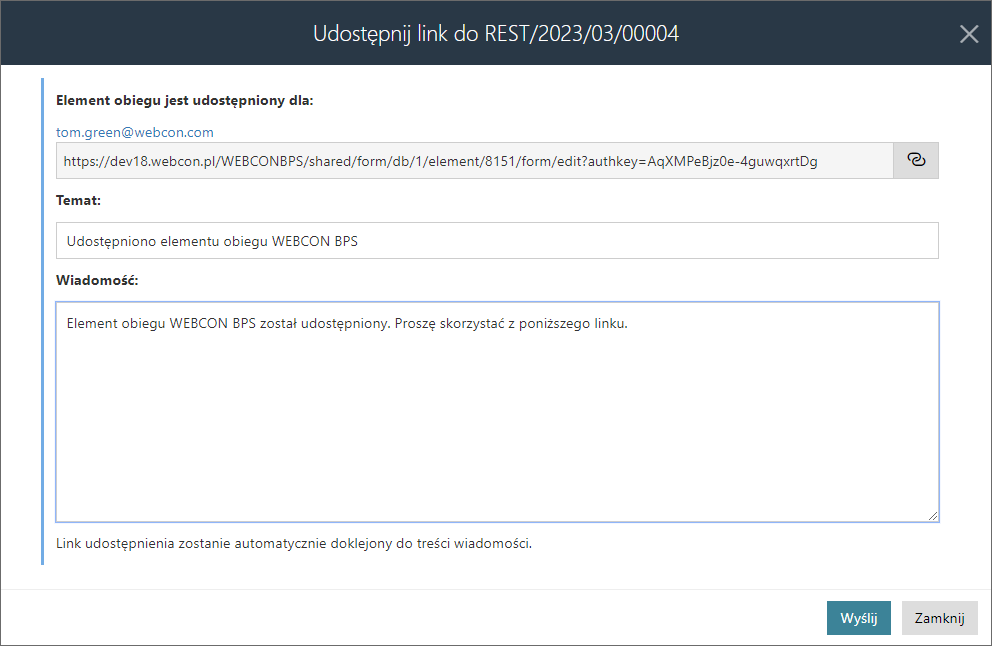
Okno z linkiem do udostępnionego elementu oraz polami do redagowania wiadomości e-mail
Po przesłaniu wiadomości na zdefiniowany adres e-mail przesyłana jest wiadomość z informacją o udostępnieniu elementu oraz użytkowniku, który go udostępnił.
Kończenie udostępniania
Zakończenie udostępnienia jest możliwe na wiele sposobów, które są uzależnione od jego rodzaju. Poniżej przedstawiono zestawienie możliwych scenariuszy zakończenia udostępnień.
- Udostępnianie elementu
- Wygaśnięcie zdefiniowanego czasu udostępniania
- Ręczne zakończenie udostępniania przez użytkownika lub administratora
- Wywołanie akcji „Zakończ udostępnianie”
UWAGA: w przypadku udostępniania elementu z uprawnieniami do edycji każde przejście ścieżką powoduje zredukowanie uprawnień do poziomu „Odczyt” i terminem ważności 1 rok.
- Udostępnianie zadania
- Wykonanie zadania – również przez inną osobę – powoduje zmianę udostępnienia na udostępnienie elementu z uprawnieniami tylko do odczytu i terminem ważności 1 rok
- Przejście ścieżką powoduje zmianę udostępnienia na udostępnienie elementu z uprawnieniami tylko do odczytu i terminem ważności 1 rok
- Wywołanie akcji „Zakończ udostępnianie”
Warto zwrócić uwagę, że w przypadku przejścia ścieżką oraz wywołania akcji „Zakończ udostępnianie” samo zadanie nie jest kończone, a modyfikowane jest jedynie udostępnienie.
Informacje na temat wszystkich zakończonych udostępnień są zapisywane przez serwis w odpowiedniej tabelce zawierającej historię udostępniania – HistorySharedInstances. Dotyczy to także opisanych powyżej sytuacji, w których zmianie ulega rodzaj udostępnienia, np. udostępnienie z uprawnieniami do edycji zastępowane udostępnieniem z uprawnieniami do odczytu po przejściu ścieżką.
- Archiwizacja
Archiwizacja bądź usunięcie elementu udostępnionego także powoduje zakończenie udostępniania oraz utworzenie wpisu dotyczącego udostępniania w bazie zawartości zawierającej dane historyczne i usuniecie odpowiedniego wpisu z tabeli zawierającej wpisy dotyczące udostępnionych elementów.
Uwagi ogólne
Po otworzeniu otrzymanego linku system tworzy konto tymczasowego użytkownika z odpowiednimi, skonfigurowanymi uprzednio (przez użytkownika w akcji bądź w formularzu poprzez przycisk „Udostępnij”) uprawnieniami wyłącznie do wskazanego elementu. Ponadto bez względu na konfigurację formularza użytkownik taki nie ma możliwości delegowania ani udostępniania zadań, w tym udostępniania elementu, a także nie posiada dostępu do szeregu opcji, takich jak narzędzia administracyjne, historia, czy też usuwanie bądź startowanie nowych elementów.
Widok formularza wyświetlanego takiemu użytkownikowi tymczasowemu odpowiada ustawieniom na „Matrycy atrybutów” oraz zdefiniowanym regułom. Istnieje jednak możliwość posłużenia się zmienną kontekstową „Czy jestem w trybie udostępniania”, aby konfigurować widoczność określonych elementów dla użytkownika.
Po udostępnieniu elementu ikona „Udostępnij” jest zastępowana ikoną Aktywne udostępnienia. Po jej kliknięciu wyświetlani się użytkownicy, którym udostępniono dany element. Warto jednak pamiętać, że użytkownik udostępniający widzi wyłącznie własne udostępnienia (nie widzi udostępnień wygenerowanych przez innych użytkowników). Prezentowane w tym miejscu informacje obejmują adres e-mail, rodzaj uprawnień oraz datę wygaśnięcia udostępnienia. Co istotne dostępne są także dwa przyciski: edycji (ikona ołówka) oraz usuwania (ikona kosza). Pierwszy z nich pozwala ponownie edytować udostępnienie (zmienić datę wygaśnięcia udostępnienia oraz rodzaj uprawnień, przy czym w konfiguracji procesu w sekcji „Udostępnianie” ustawionym trybem musi być tryb „Edycja”), z kolei drugi usuwa wybrane zaznaczenie.

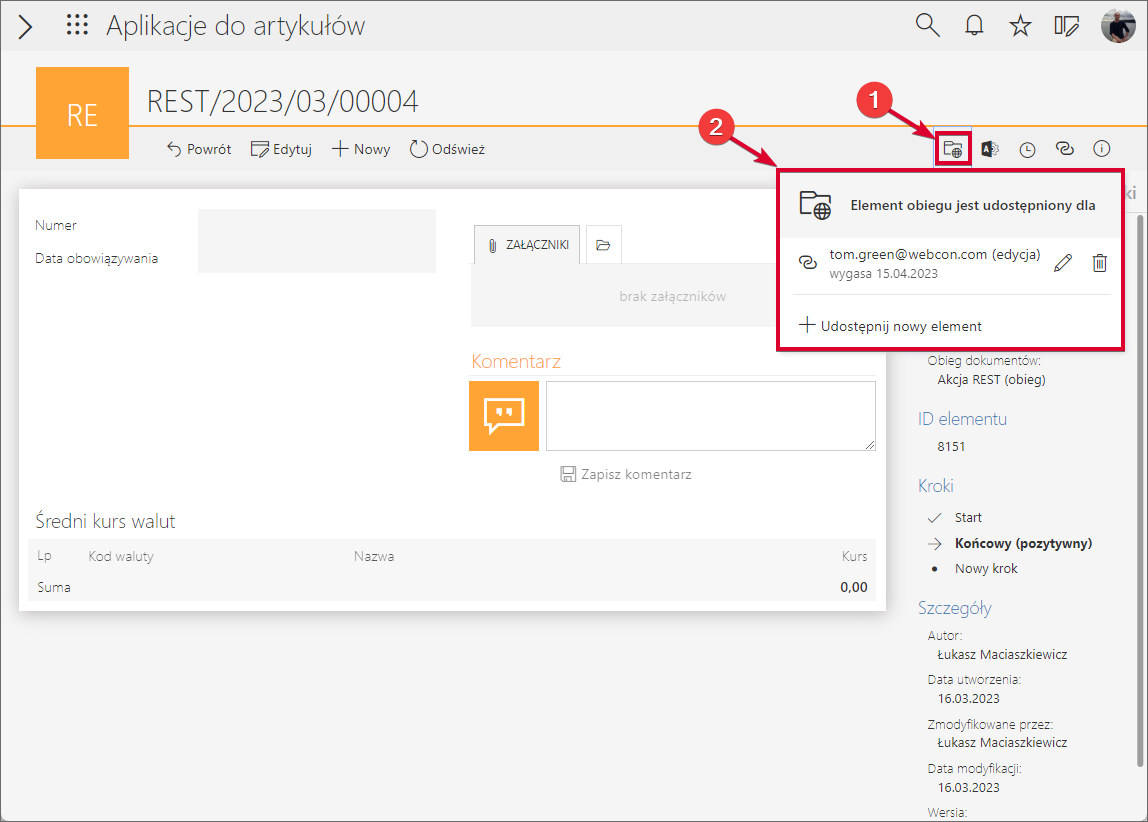
Przycisk aktywne udostępnienia prezentuje adresy e-mail, dla których udostępniono element
Uprawnienia administratora
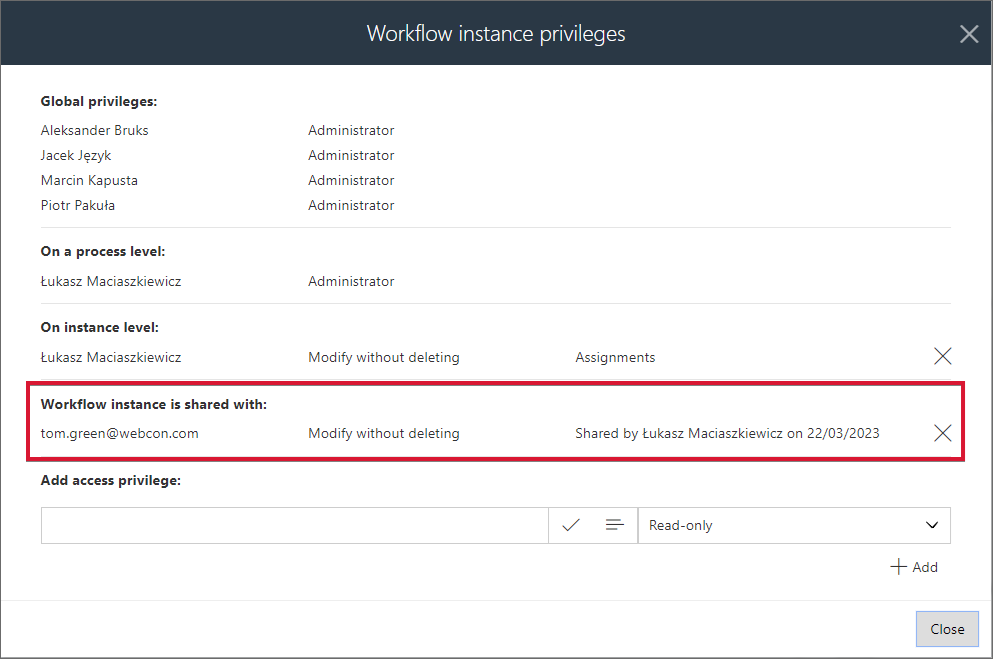
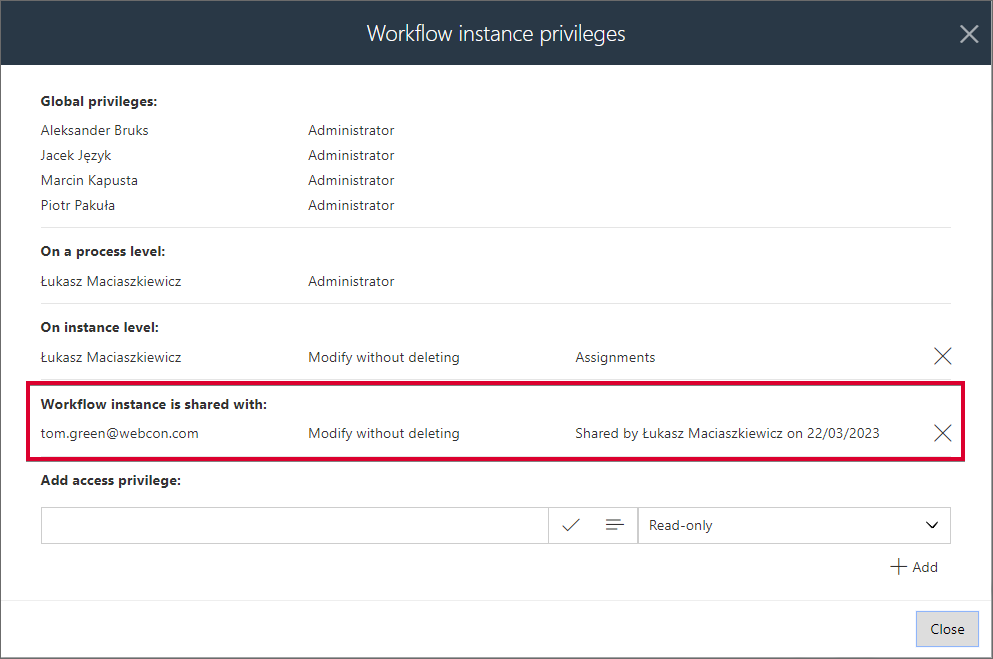
Administrator, pracując w trybie administracyjnym, widzi wszystkie udostępnienia, elementów i zadań, i może je usuwać oraz, w przypadku udostępnień elementów, edytować. Oprócz możliwości wyświetlania wspomnianych udostępnień bezpośrednio w formularzu za pomocą przycisku „Aktywne udostępnienia”, może on uzyskać do nich dostęp w panelu administracyjnym (przycisk „Aktywne udostępnienia”) oraz w oknie „Uprawnienia do elementu obiegu” (przycisk koła zębatego „Akcje administracyjne” → pozycja „Uprawnienia). W drugim przypadku nie ma możliwości edycji udostępnień (dostępna jest jedynie możliwość ich usuwania).
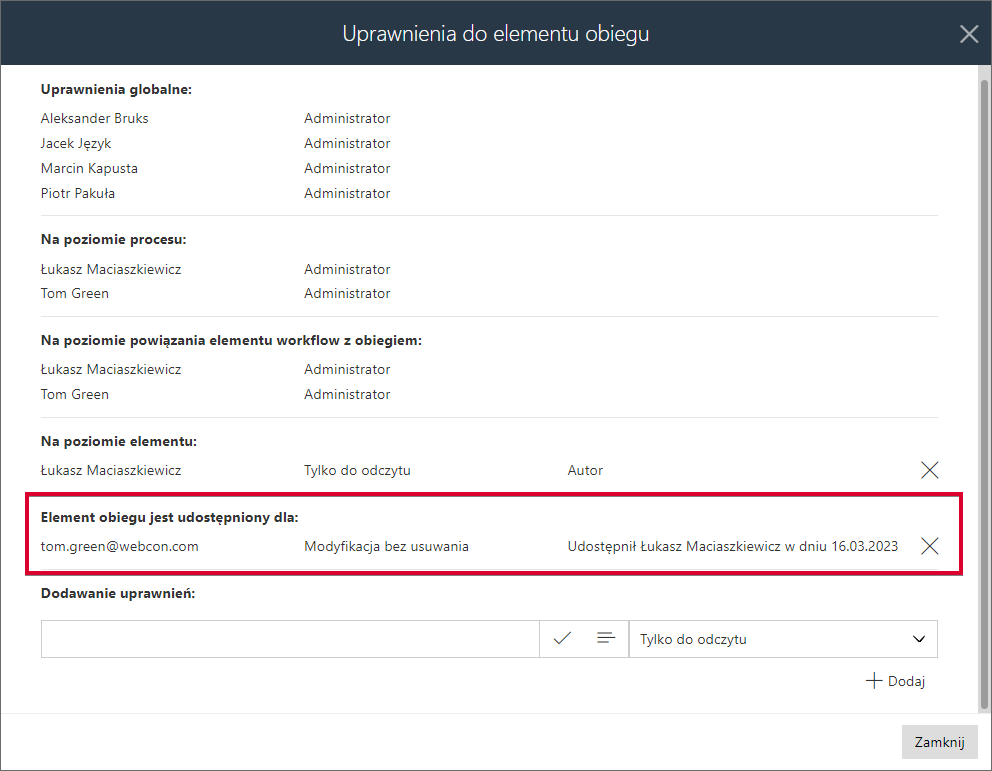

Okno „Uprawnienia do elementu obiegu” zawiera informacje o udostępnieniach
Warto jeszcze wrócić do wspomnianej powyżej opcji „Aktywne udostępnienia” dostępnej w panelu administracyjnym. Jest to widok pozwalający wyświetlać oraz modyfikować (edytować i usuwać) wszystkie aktywne udostępnienia bez względu na ich rodzaj (udostępnienie elementu lub zadania). Jest on wyposażony w możliwość filtrowania udostępnień, co jest szczególnie przydatne w sytuacji, gdy liczba udostępnień jest duża.
Weryfikacja tożsamości za pomocą kodów autoryzacyjnych
Od wersji 2023 R2 w ramach opisywanej funkcjonalności dostępna jest możliwość zabezpieczania linków jednorazowym kodem autoryzacyjnym przesyłanym na adres poczty elektronicznej odbiorcy linku. Rozwiązanie to wyklucza nieupoważniony dostęp do udostępnianego elementu ze strony osób, które otrzymały link przez przypadek.
- Aktywowanie funkcjonalności
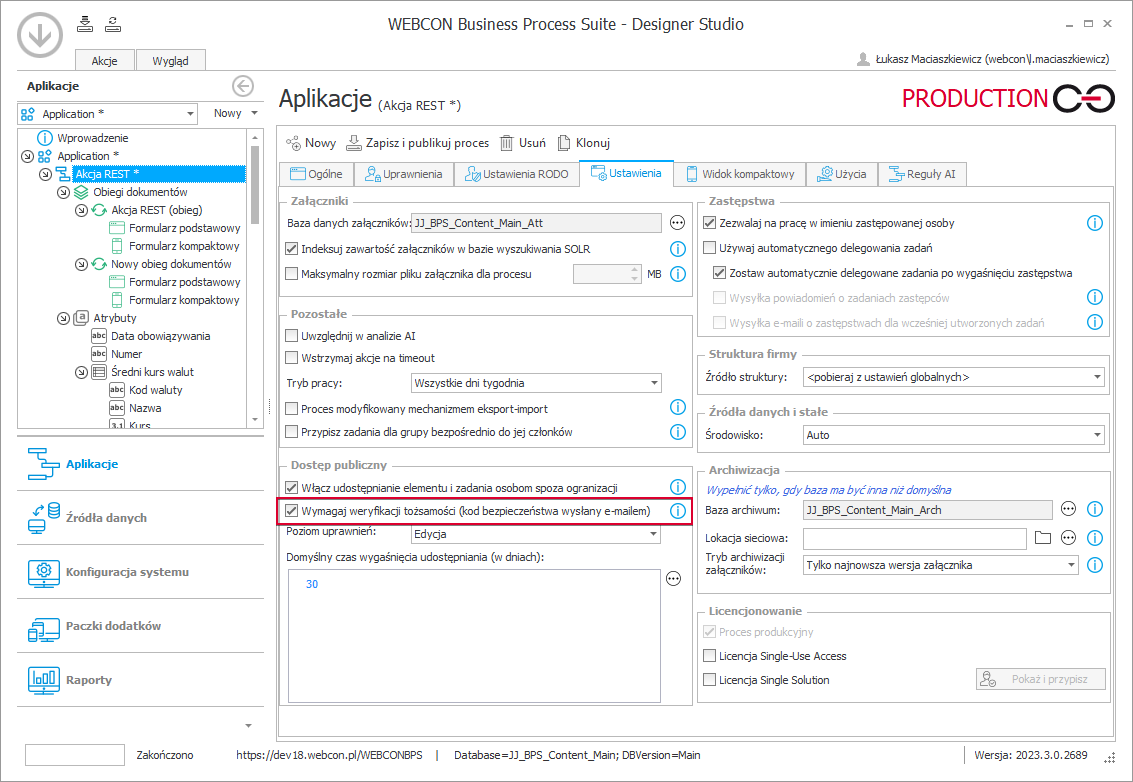
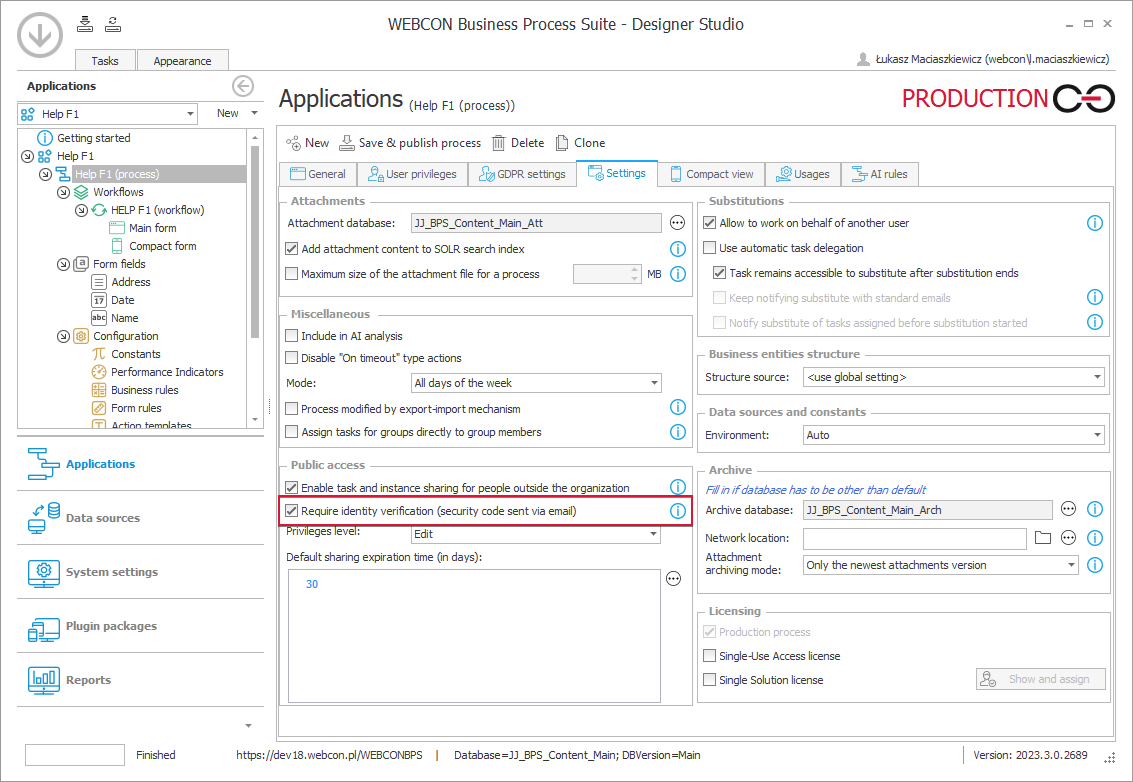
Mechanizm weryfikacji tożsamości jest domyślnie włączony w Designer Studio [zaznaczony przycisk wyboru Wymagaj weryfikacji tożsamości (kod bezpieczeństwa wysłany e-mailem)] zaraz po aktywowaniu dostępu publicznego (nazwa procesu → zakładka Ustawienia → sekcja Dostęp publiczny → przycisk Włącz udostępnianie elementu i zadania osobom spoza organizacji). Aby go wyłączyć, należy odznaczyć wspomniany w przycisk wyboru.

- Sposób działania
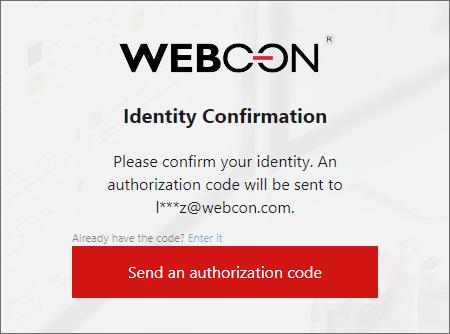
Działanie mechanizmu uwidacznia się po otwarciu zabezpieczonego linku i przejściu na stronę Portalu – system wyświetla wówczas informację o konieczności potwierdzenia tożsamości za pomocą jednorazowego kodu autoryzacyjnego.

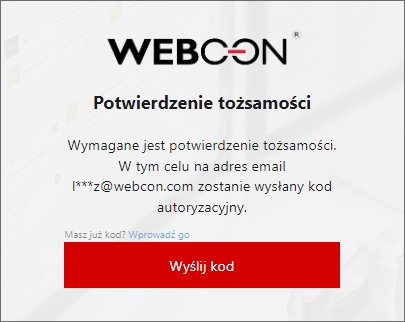
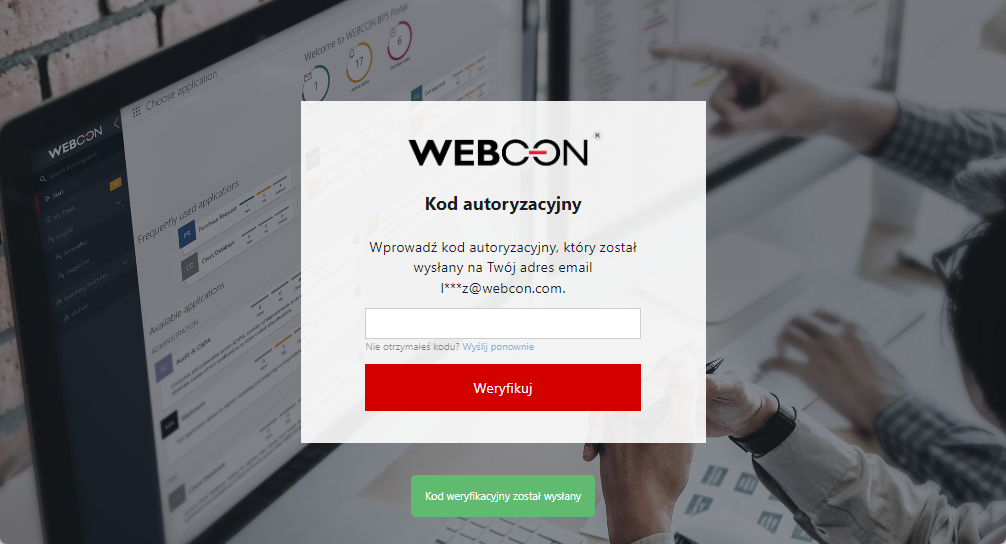
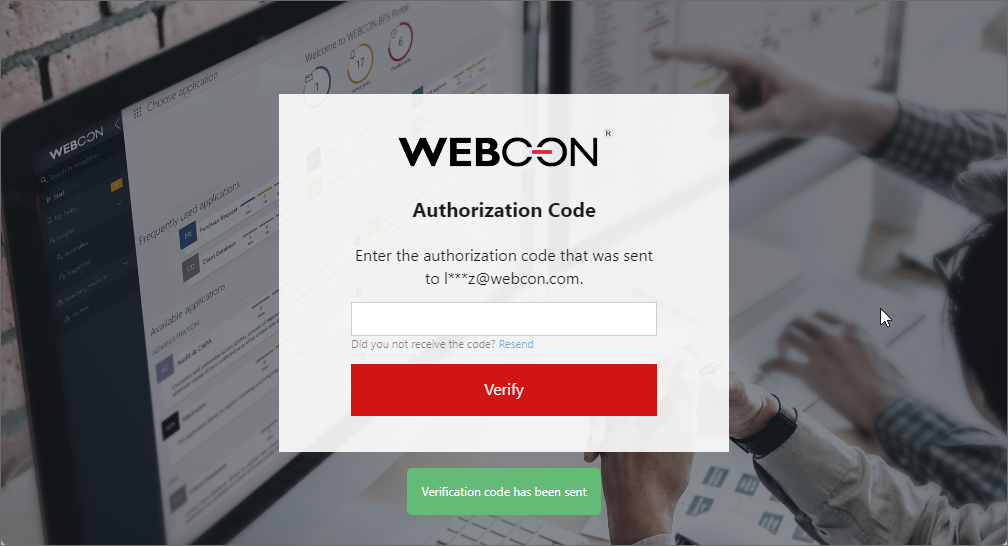
6-cyfrowy kod jest generowany po naciśnięciu przycisku Wyślij kod i przesyłany na adres poczty elektronicznej docelowego odbiorcy linku. [Wiadomości e-mail wysyłane są w języku, w którym użytkownikowi wyświetlono okno wprowadzania kodu autoryzacyjnego w Portalu (zgodnym z ustawieniem języka w przeglądarce internetowej)]. Wysłanie kodu dodatkowo potwierdzone jest komunikatem Kod weryfikacyjny został wysłany wyświetlanym w zielonym polu poniżej obszaru służącego potwierdzeniu tożsamości.
Dla każdego udostępnionego elementu generowany jest osobny kod ważny przez 5 min – po tym czasie konieczne jest wygenerowanie nowego kodu, który należy wprowadzić w polu tekstowym i nacisnąć przycisk Weryfikuj. (Warto nadmienić tutaj, że użytkownik może pracować równolegle w kilku przeglądarkach, generując i podając przy tym różne kody autoryzacyjne).

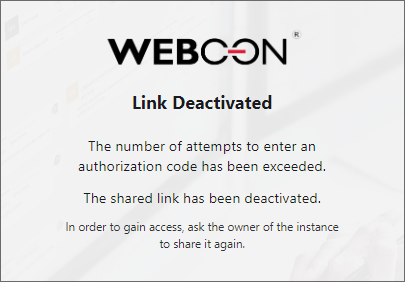
- Limit prób
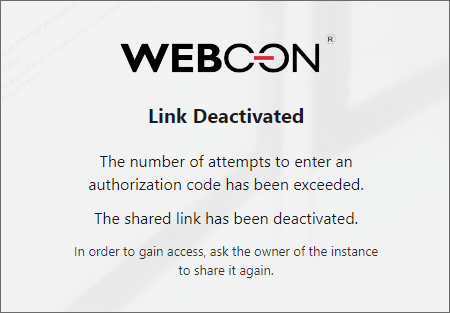
Należy mieć na uwadze, że po 20 nieudanych próbach zalogowania link publiczny staje się nieaktywny, a system wyświetla informację, że link wygasł (informacja o tym jest widoczna także na formularzu oraz w panelu administratora). Administrator lub autor linku może ponownie aktywować link. Dostęp do ponownie udostępnionego elementu bądź zadania będzie wymagał ponownego wygenerowania i wprowadzenia kodu autoryzacyjnego przez docelowego odbiorcę.

- Interwał wymuszenia autoryzacji
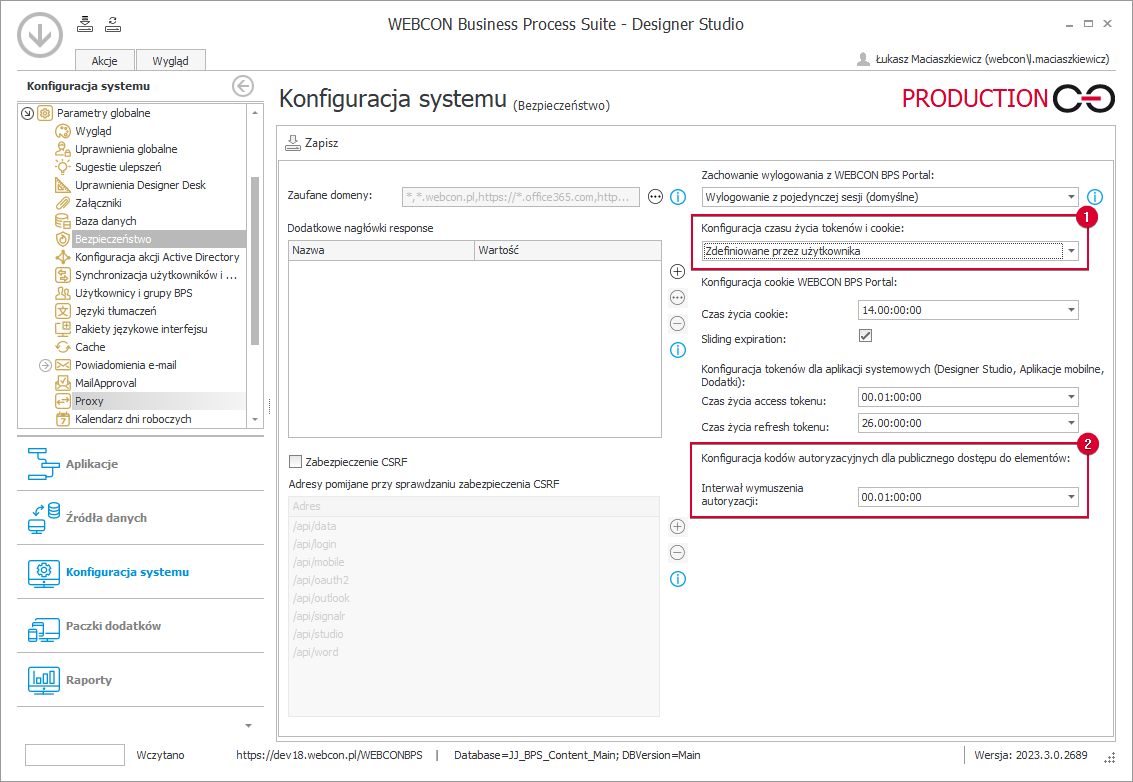
Warto zwrócić uwagę, że po godzinie od momentu uzyskania dostępu do udostępnionego elementu bądź zadania system automatycznie wymusza ponowną autoryzację, o ile użytkownik nie edytuje aktywnie formularza danego elementu bądź zadania. Wspomniany czas można jednak zmienić, przechodząc do węzła Bezpieczeństwo (Konfiguracja systemu → Parametry globalne) i modyfikując wartość w polu Interwał wymuszenia autoryzacji dostępnym w sekcji Konfiguracja kodów autoryzacyjnych dla publicznego dostępu do elementów. (Należy przy tym pamiętać, że pole to jest aktywne wyłącznie w przypadku uprzedniego ustawienia wartości Zdefiniowane przez użytkownika w polu Konfiguracja czasu życia tokenów i cookie).

- Informacje o zabezpieczonym udostępnieniu
Informacje na temat zabezpieczenia linku kodem autoryzacyjnym oraz jego statusu są dostępne dla administratora oraz autora udostępnienia.
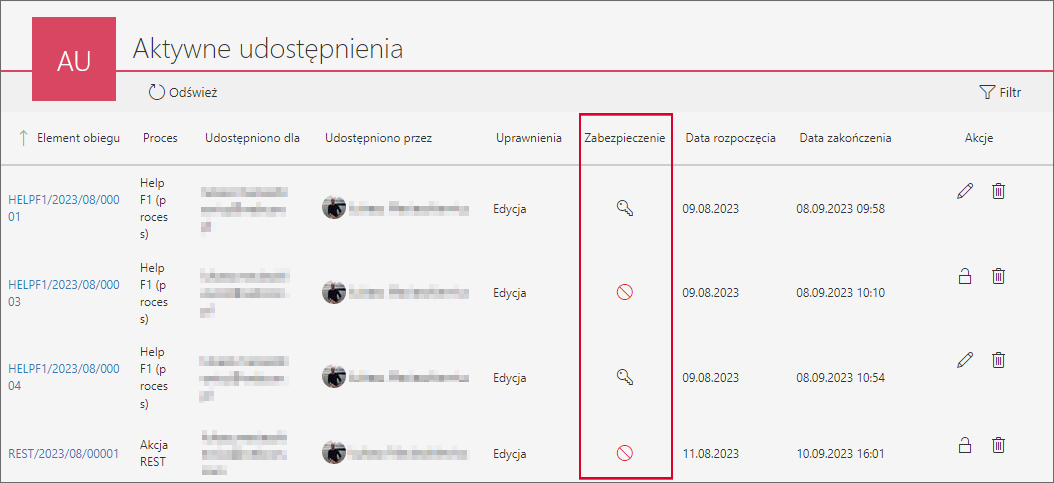
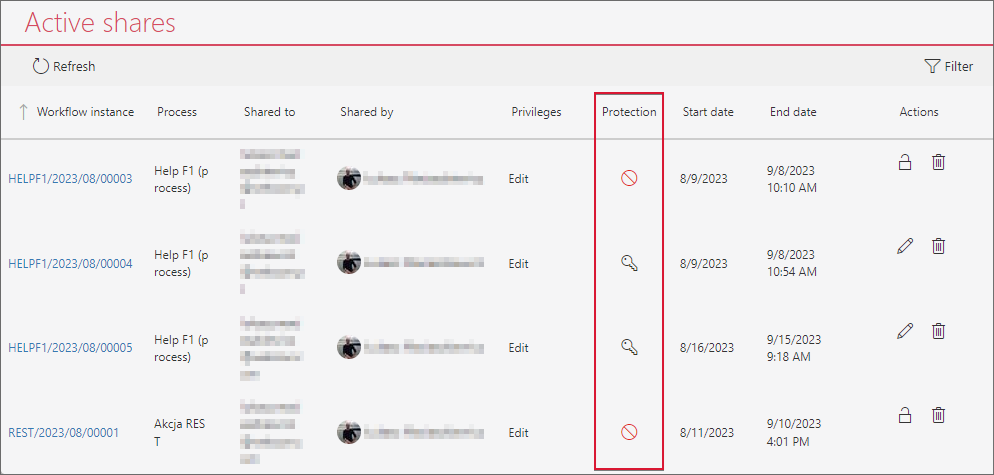
W pierwszym przypadku informacje takie są dostępne w Panelu Administracyjnym w kolumnie Zabezpieczenie listy Aktywne udostępnienia. Ikona klucza informuje o włączonej weryfikacji tożsamości dla danego udostępnienia, z kolei ikona ogólnego znaku zakazu wskazuje na jego zablokowanie (ze względu na przekroczenie limitu prób logowania lub przekroczenie interwału wymuszenia autoryzacji) – brak ikony oznacza, że udostępnienie nie zostało zabezpieczone. Po najechaniu na wspomniane ikony wyświetlany jest tooltip informujący odpowiednio o wymaganej weryfikacji lub dacie, od której dostęp do linku został zablokowany.
W przypadku blokady dostępu istnieje możliwość ponownego udostępnienia linku poprzez naciśnięcie ikony kłódki znajdującej się w kolumnie Akcje.

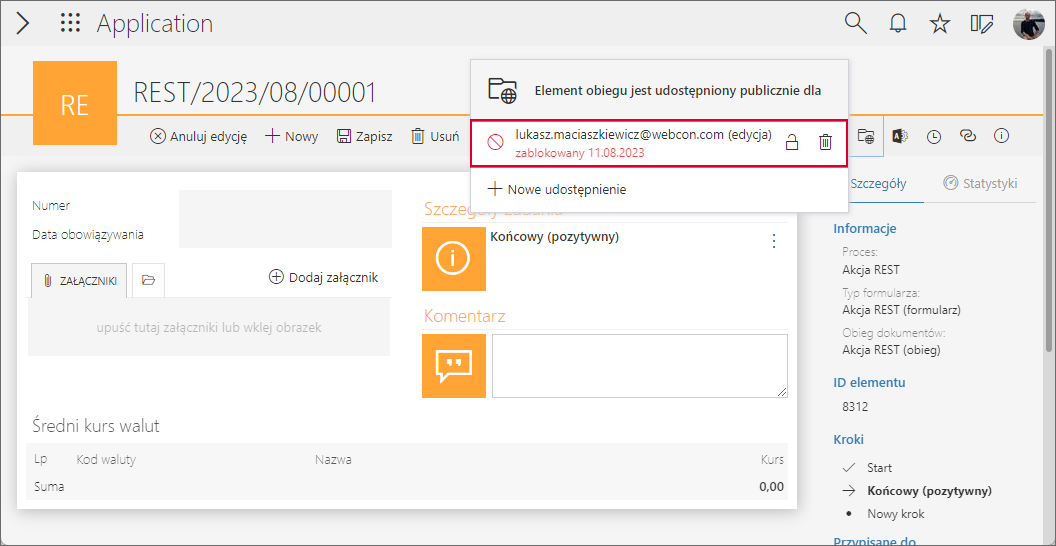
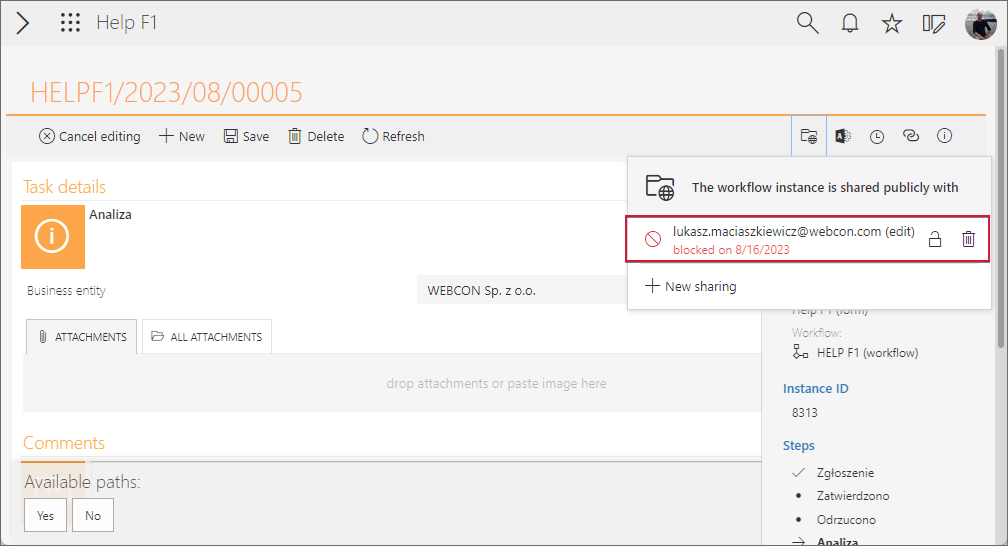
Autor udostępnienia także uzyskuje informacje o zablokowaniu udostępnienia (informacja o konieczności weryfikacji tożsamości nie jest wyświetlana). Jest ona prezentowana w formie wspomnianej już wcześniej ikony ogólnego znaku zakazu po kliknięciu ikony Aktywne udostępnienia w lewym górnym rogu formularza.
Także w tym przypadku naciśnięcie ikony kłódki umożliwia autorowi ponowne udostępnienie linku.

Podsumowanie
Funkcjonalność publicznego linku to bardzo użyteczne narzędzie pozwalające łatwo i wygodnie, a przy tym bezpiecznie, udzielać dostępu do elementów bądź zadań. Jest ona szczególnie przydatna w sytuacjach, gdy konieczne jest zaprezentowanie specyficznych treści osobom, które niekoniecznie potrzebują dostępu do całego procesu bądź z innych względów go fizycznie nie posiadają. Dzięki elastyczności zapewnianej przez to rozwiązanie przedsiębiorstwa mogą łatwo włączać do projektów osoby spoza firmy i korzystać z zewnętrznej wiedzy i doświadczenia.
=====================================================
EN
Applies to version: 2023 R1 and above; author: Łukasz Maciaszkiewicz
Introduction
Effective competition on the current market demands that companies possess a high degree of flexibility and the capability to access and make use of external resources. Many times, particularly when the internal resources of a company or its division appear to be insufficient, it is necessary to involve external experts, especially when a project or a task is non-recurrent and hiring a permanent expert is economically infeasible.
To share instances and tasks safely and conveniently, the WEBCON BPS platform is provided with the public link functionality. It allows users to share instances or tasks quickly and seamlessly with individuals holding no access to a particular application or process, or even people outside the company, thus supporting its business activity.
This article describes the aforementioned functionality and discusses its configuration as well as its main features.
Enabling the public link functionality
Along with implementation of the public link functionality comes a new section Sharing available now in the process “Settings” tab in Designer Studio. To use the aforementioned functionality in a selected process, check the Enable instance and task sharing button in the “Sharing” section.
Once it is checked, other fields placed in the section become editable, i.e. Privileges level and Default sharing expiration time (in days). The “Privileges level” option contains a drop-down list that allows you to specify whether the instances are shared with edition (Edit) or read-only (Read only) rights. On the other hand, the “Default sharing expiration time (in days)” option allows you to specify the number of days after which sharing will be deactivated. You can also define or calculate the number of days using a business rule inserted in the field mentioned above.
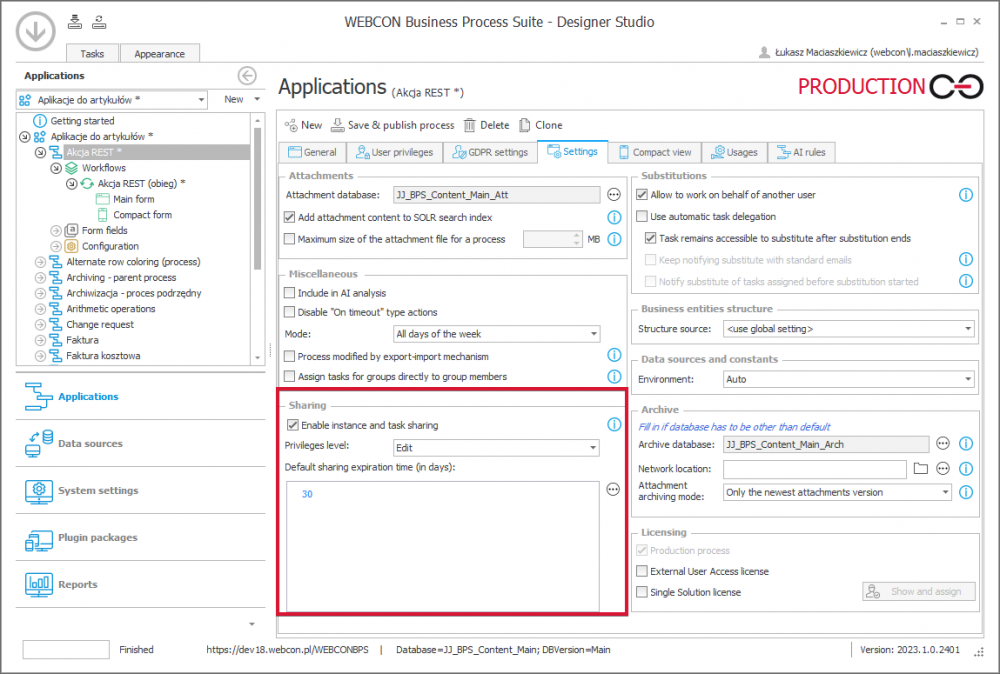
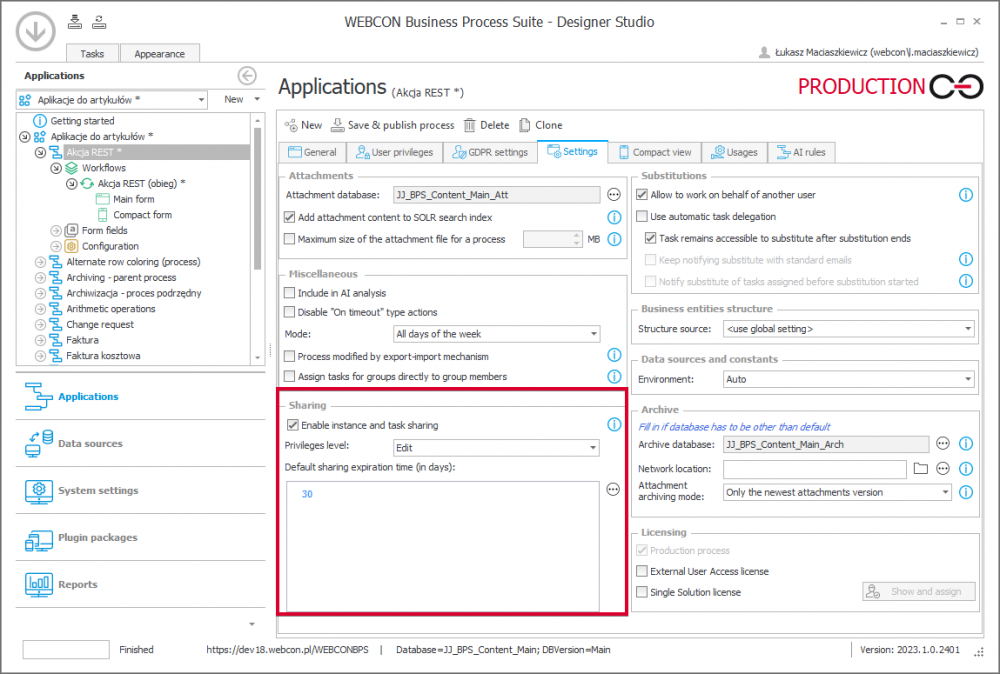
The “Sharing” section lets you enable the public link functionality
Note that checking the button itself will also modify the configuration of the Designer Studio. One of the modifications involves access to three sharing actions and the ability to insert the “Share” button directly in the form. Other modification is the appearance of new business rules. The aforementioned configuration elements are discussed below.
Context variables
Once you check the public link functionality, the business rule editor is expanded with new context variables. The Is instance shared? variable is added to the “Information” group in the “System fields” node, enabling users to check whether a given instance has been shared. Additionally, the Is share mode active? variable is added to the “Form display modes”. The variable checks whether the form is currently displayed in the share mode for the temporary user.
Sharing actions
After enabling the public link functionality in the process settings, the user gains access to the three sharing actions belonging to the “Privileges and sharing” group: Share workflow instance, Share task, and Stop sharing.
The actions can be embedded in:
· process automations (the “System settings” button → the “Automations” node in the selection tree),
· workflow automations (as actions inserted globally in the workflow or in a particular step),
· action templates (process name → the “Configuration” button → the “Action templates” node).
Note that these actions are not available in global automations.
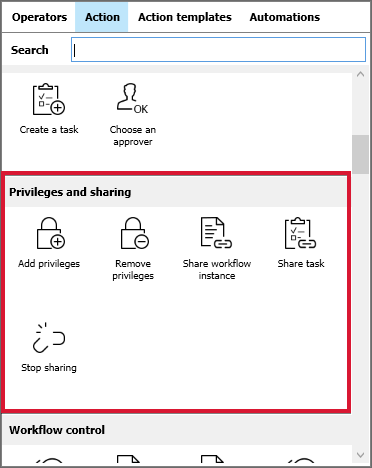
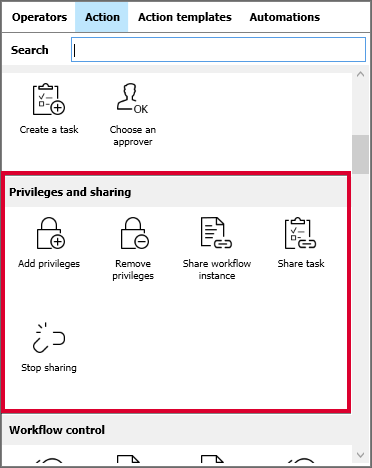
Enabling the public link functionality makes available three new actions
A detailed description of each action, including presentation of the contexts under which they can be invoked, is provided below.
· Share workflow instance
The action allows you to share a selected BPS workflow instance in the read-only or edition mode. User can specify a person or persons an instance is to be shared with by entering at least one e-mail address in the Instance shared with (email addresses) field in the action configuration window (they can also use business rule to define a list of e-mail addresses). For each specified e-mail address there is a separate sharing with a unique link to the selected instance.
It is also necessary to configure an e-mail sent as a notification to a person obtaining the link. To do that, enter the e-mail subject in the “Confirmation email - subject” in the action configuration window and type in its content in the “Confirmation email - message” field. The message is sent to the e-mail address entered previously along with a link to the shared instance and sent in accordance with the global template for sending e-mail notifications (the “System settings” button → the “E-mail notifications” node → “Configuration of sending e-mails).
To determine the level of privileges of an individual holding the link to the shared instance, select either Read only (user can only display shared instance) or Edit (user can edit content of the shared instance) from the drop-down list in the Privileges level field.
When configuring the action, the user must also specify the time through which the sharing will remain active in the Sharing expiration time (in days). When the specified time elapses, the system records the information on sharing and its author, and the sharing itself is deactivated. Remember that it is possible to stop sharing earlier by means of the Stop sharing action.
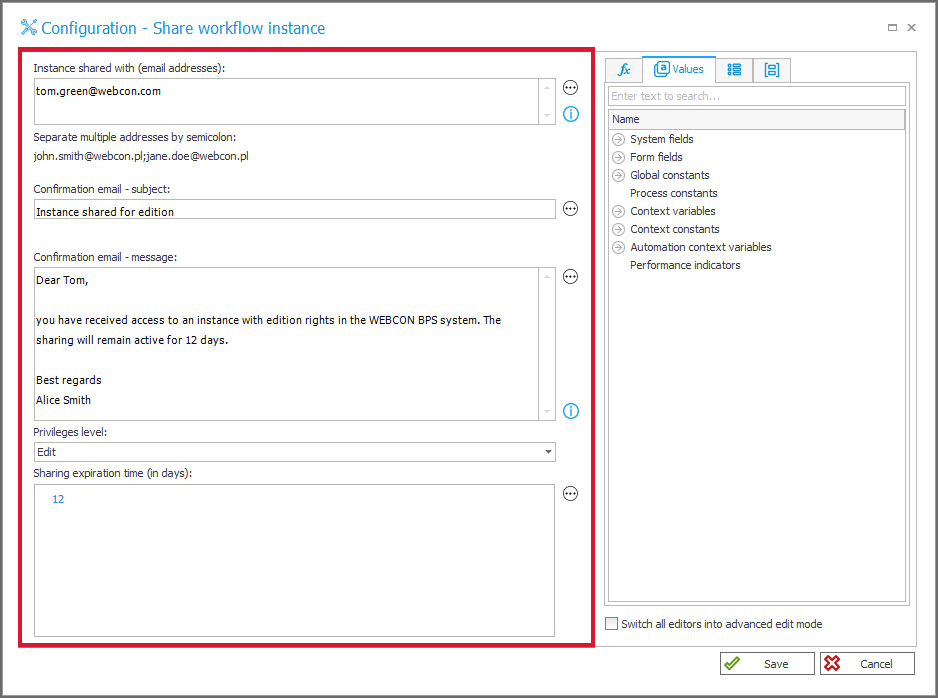
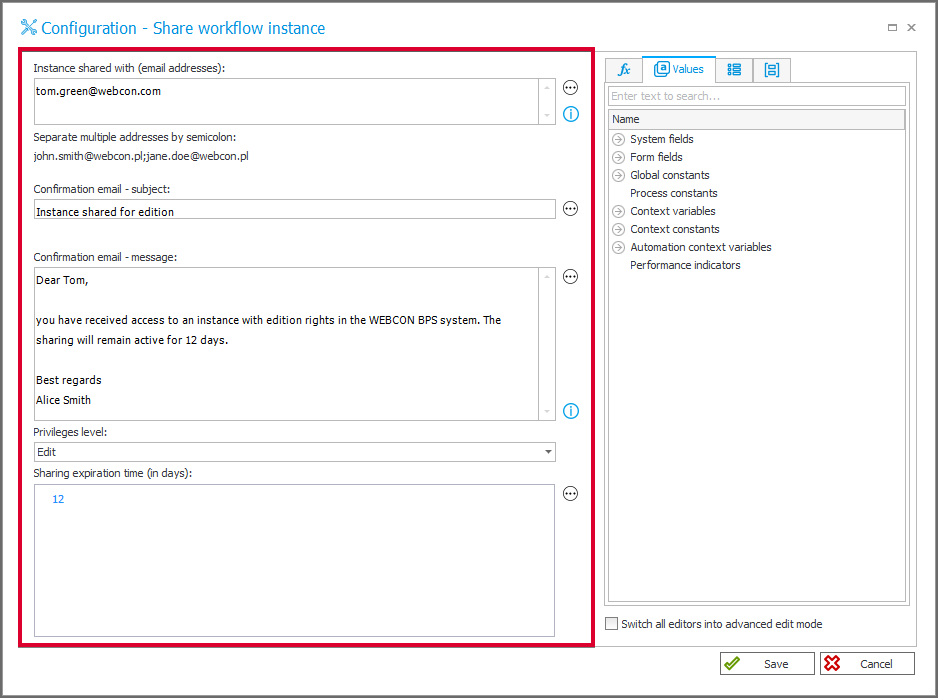
A demonstrative configuration of the “Share workflow instance” action
If the same user invokes the action for the already existing and active sharing and for the same e-mail address, the sharing is reedited and the link to the instance is sent again (if the action is embedded in the on-path automation.
The “Share workflow instance” action can be invoked in the following contexts:
“On entry”, “On exit”, “On timeout”, “On browser opening”, “Menu button”, “On path”, “Upon instance saving”.
· Share task
The action allows you to generate and directly share tasks in the system. Like in the case of the “Share workflow instance” action, the task is shared through a unique link sent to the e-mail address specified in the Assign task to (email addresses). You can specify multiple e-mail addresses for which separate task links will be generated.
What is important the task settings correspond with the settings specified on path between steps, e.g. if the “Completion – Any” option is selected in the “Parallelism” field (workflow name → the “Workflow designer” tab → double click the required path → the “Task creation” tab → the “Parallelism” field), the task must be executed only by one of the persons holding the link.
Once you enter the e-mail address or addresses, you need to create an e-mail notification that is sent together with the link to the task. Enter the message subject in the Confirmation email - subject field and its content in the Confirmation email - message.
There is no sharing expiration time limit for the “Share task” action. Once a task is executed, the task sharing is automatically replaced with instance sharing with read-only privileges and 1-year expiration time. The same applies to situations where a task shared with multiple persons is executed by one of them (if the task had been configured as “Completion – Any”).
It is important to remember that once a task is completed, information on its sharing is recorded in the historical data table.

A demonstrative configuration of the “Share task” action
Sharing the same task again results in overwriting the current sharing and resending e-mail notification.
The “Share task” action can be invoked in the following contexts:
“On entry”, “On exit”, “On path”, “Upon instance saving”.
· Stop sharing
The action ends sharing of a specified instance for all users. Unlike the actions discussed above, the “Stop sharing” action does not send e-mail notification. The action has no configuration window – once it is embedded in automation, it can be deactivated by pressing the “Deactivate” button in the drop-down menu.
The “Stop sharing” action can be invoked in the following contexts:
“On entry”, “On exit”, “On timeout”, “On browser opening”, “Menu button”, “On path”, “Upon instance saving”.
Sharing with form button
In addition to the abovementioned actions that automate the sharing process, the WEBCON BPS system also offers a convenient, alternative sharing method, i.e. the Share button available in the form. This method requires direct involvement from a user who in this case must manually configure sharing in the form.
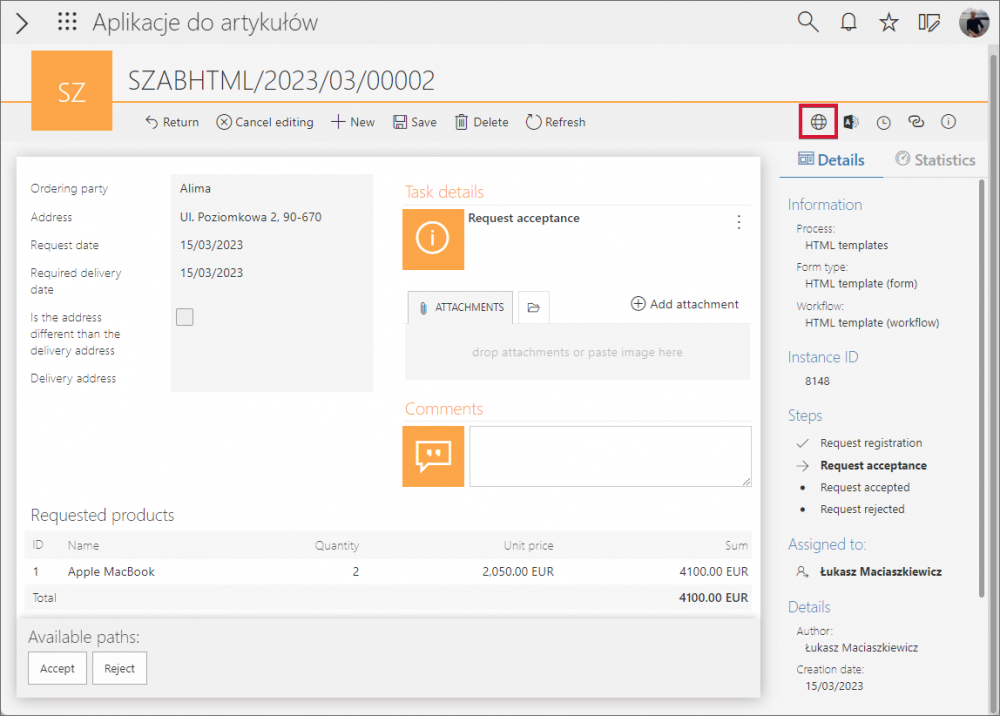

A demonstrative form with the “Share” button inside a red frame
As mentioned in the introduction to this article, in order to insert the “Share” button in the form, it is necessary to enable the public link functionality in the process configuration (checking the “Enable instance and task sharing” checkbox in the “Sharing” section). You can manage the availability of the button in the “Field matrix” (workflow name → “Main form” → “Field matrix” → “Standard areas”) and by editing the form layout in a selected step (workflow name → the “Workflow designer” tab → step name → the “Forms” tab).
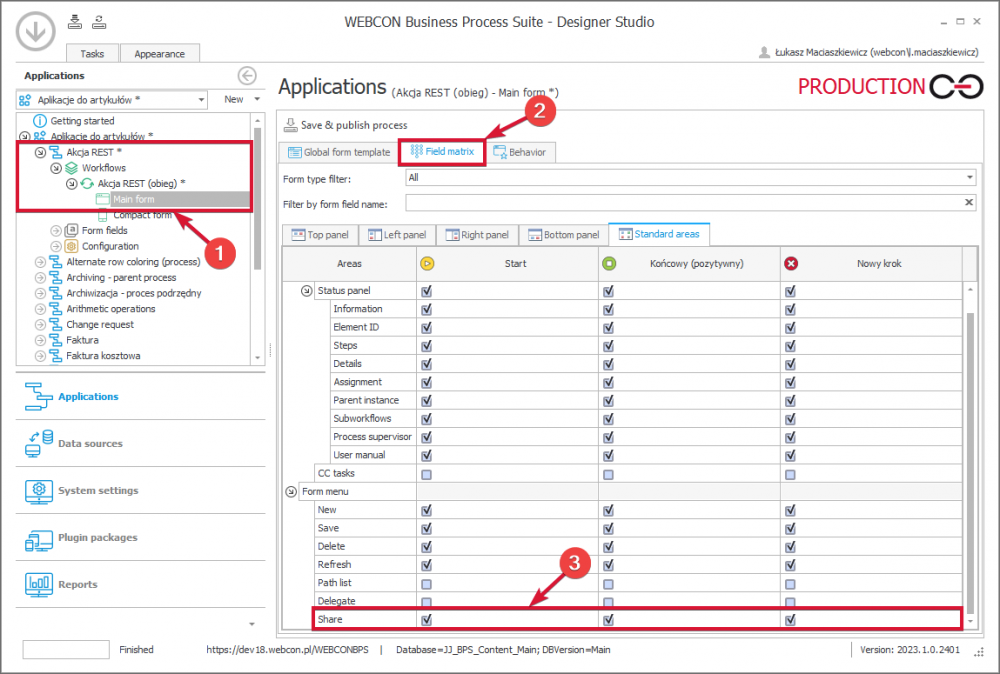
Field matrix containing checked “Share” button availability checkbox
Note here that the button is not visible for new instances (even when configured as visible in the initial step).

To make the “Share” button unavailable, uncheck the respective checkbox in the “Main form” tab.
The button cannot be further configured and its operation follows process settings. By pressing the button, a window will open where you can enter the e-mail address of the person with whom you wish to share the instance [Share workflow instance with (email address)]. Furthermore, you can specify the level of privileges for the person by checking the Allow editing button, which enables them to make changes to the shared instance. Conversely, unchecking the button restricts them to read-only access.
In the Expiration date field you can specify how long the sharing will remain active – once this time elapses, the sharing will be deactivated.
After entering all the required information, click the Share button.

Sharing window opened after clicking the “Share” button
Once you share the instance (click the “Share” button), a new window opens. It contains information on e-mail address for which the instance was shared and link to the instance. There are also two additional fields below that allow you to create an e-mail notification sent to the specified address. Like the actions configuration, you can enter the e-mail subject and content in the Subject and Message fields, respectively. Both fields are by default filled out with standard content in the current language of the form. The instance link mentioned earlier is automatically added to the e-mail content.
Window containing link to the shared instance and fields for creating an e-mail notification
After clicking the Send button, the specified e-mail address receives a message with information on instance sharing and the user who shared it.
Ending the sharing
There are multiple ways to stop sharing which are dependent on its type. Below are some possible scenarios for ending the sharing.
· Instance sharing
oElapse of defined sharing expiration time
oManual stopping of sharing initiated by either the user or the administrator
oInvoking the “Stop sharing” action
NOTE: when sharing an instance with edition rights, each path transition reduces privileges to the “Read only” level and 1-year expiration time.
· Task sharing
oTask execution – including by other person – results in replacing the sharing with a new one with read-only privileges and 1-year expiration time.
oPath transition results in replacing the sharing with instance sharing with read-only privileges and 1-year expiration time.
oInvoking the “Stop sharing” action
Please note that transiting a path or invoking the “Stop sharing” action only ends the sharing, not the task itself.
Information on all finished sharings is recorded by the service in a dedicated table containing sharing history – HistorySharedInstances. The same principle applies to the previously mentioned situations that involve changing the type of sharing. For example, transiting a path will replace the existing sharing with editing rights with a new one that has read-only rights.
· Archiving
When a shared instance is archived or deleted, the sharing is ended and a record is created in the content database containing historical data. The relevant entry is also deleted from the table which contains information about shared instances.
General remarks
When the received link is opened, the system generates a temporary user account with the appropriate privileges that were configured by the user either in the action or form using the “Share” button. These privileges relate exclusively to the specified instance. Additionally, regardless of the form configuration, this type of user is not able to delegate tasks or share tasks and instances with others. They are also restricted from accessing certain options, including administrative tools, history, deleting instances, or starting new ones.
The form view that is displayed to the temporary user is determined by the configuration entered in the “Field Matrix” and the defined rules. To control the visibility of defined elements for the temporary user, it is possible to use the “Is share mode active?” option.
The “Share” button icon is replaced with the Active shares icon once an instance is shared. Clicking on the icon will display a list of users with whom the instance is shared. Please note that users can only view their own sharings and cannot see sharings generated by other users.. The information presented here include e-mail address, type of privileges, and sharing expiration date. There are also two additional buttons available: edition (pencil icon) and deletion (bin icon). The first option enables you to edit the sharing by changing the expiration date or type of privileges (if the mode set in the process configuration “Sharing” section is “Edit”), while the second option deletes the selected sharing.
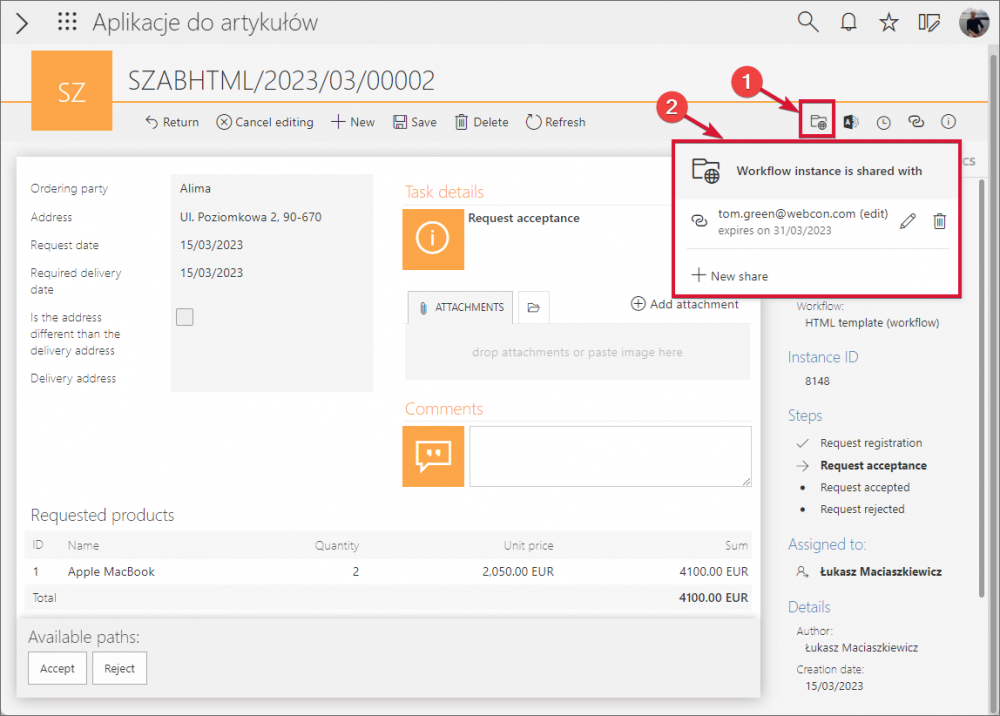

The “Active shares” button displays the e-mail addresses with which an instance has been shared.
Administrator privileges
When operating in admin mode, an administrator can view all instances and tasks that have been shared and delete them if necessary. In the case of instances, the administrator can also edit them. An administrator can view the aforementioned sharings in multiple ways. They can click the "Active shares" button to display them directly in the form, or access them through the admin panel (by clicking the Active shares button) or the "Workflow instance privileges" (the "Admin actions" gear button → the "Privileges" option). The last option does not allow user to edit the sharings (it is only possible to delete them).

The “Workflow instance privileges” window contains information on sharings
It is worth to briefly address the aforementioned “Active shares” option available in the admin panel. It is a view that enables users to display and modify (edit and delete) all active sharings regardless of their type (instance or task sharing). The view provides a filtering function for sharings, which is particularly useful when there is a large number of sharings to manage.
Identity verification with security codes
Starting from the 2023 R2 version, it is possible to enhance the security of public links by utilizing a single-use authorization code which is sent to the email address of the link recipient. This solution prevents individuals who have accidentally obtained the link from gaining unauthorized access to the shared instance.
· Enabling the functionality
The identity verification mechanism is by default enabled in Designer Studio [selected the Require identity verification (security code sent via email) checkbox] immediately after activating the public access (process name → the Settings tab → the Public access section → Enable task and instance sharing for people outside the organization). To disable it, unselect the aforementioned checkbox.

· Operation
You can notice the mechanism operation after opening a secured link. The system redirects you to the Portal’s website and displays information about obligatory confirmation of identity by means of a single-use authorization code.

A 6-digit code is generated after clicking the Send an authorization code and sent to the e-mail address of the intended link recipient. [The messages are sent in the language in which a user displayed the window for entering authorization code in Portal (which corresponds with the language set in the Internet browser)]. The code delivery is confirmed with the message Verification code has been sent which is displayed within a green box under the area used for identity confirmation.
A separate code valid for 5 min is generated for each shared instance – after 5 min it is necessary to generate a new code which must be entered in the text field and press the Verify button. (It is worth noting here that a user can work simultaneously in several browsers by generating and entering different authorization codes).

· Limit for the number of attempts
It is important to remember that after 20 unsuccessful log-in attempts the public link becomes inactive and the system displays information that the link expired (this information is also presented in the form and the Admin Panel). The administrator or the link author can reactive the link. To access the instance or task to which a link was reactivated, the intended recipient needs to generate and input a new authorization code.

· Identity verification interval
After an hour has passed since gaining access to the shared instance or task, the system will automatically prompt for new authorization, unless a user is actively editing a form within the given instance or task. You can modify this time in the Security node (System settings → Global parameters) by changing the value in the User identity verification interval field provided in the section Security codes configuration for sharing workflow instances publicly. (Please note that this field is active only if you had set the User defined value in the Tokens and cookies lifetime configuration field.)


· Information about secured link
Information regarding securing a link with an authorization code and its status is accessible to both administrators and link authors.
In the first case, this information is available in the Admin Panel in the Protection column of the Active shares. The key icon indicates that identity verification is enabled for a specific share, while the general prohibition sign icon signals that the share has been locked (possibly due to exceeding login attempt limits or authorization intervals). An empty field indicates that the share is not secured. After hovering over the icons mentioned earlier, a tooltip is displayed providing information about the required verification or the date when the link was locked.
For the locked access, it is possible to share the link again by clicking the lock icon available in the Actions column.

The link author also receives information about locking the share (the information on necessary identity verification is not displayed). It is presented in the form of the aforementioned general prohibition sign icon after clicking the Active shares icon in the top, left form corner.
Similarly, by clicking the lock icon here, the author can re-enable the sharing of the link.

Summary
The public link functionality is a very useful tool that enables users to share access to instances or tasks quickly and conveniently. It is particularly helpful when specific content needs to be presented to third parties who do not necessarily need access to the whole process or do not have it for other reasons. This feature provides companies with the flexibility to involve external individuals in their projects, enabling them to leverage external knowledge and experience.